My brothers and I do a gift exchange each Christmas, and we always give to each other's children. It's easy on my side of the family...I only have two nieces (so far)! My darling sister-in-law gave me a few suggestions: a winter dress for the youngest and a dolly and me outfit for her older girl.
Showing posts with label Friend's Tutorials. Show all posts
Showing posts with label Friend's Tutorials. Show all posts
10 January 2012
26 July 2011
Making Dolly Clothes and Generations
As the only girl in my family, I spent a lot of time by myself playing with my dolls. They were my babies, and I cared for their every need. I got them ready for bed, fed, clothed, and diapered with the best of them. Even when I was too old to "play" with my babies, I made them wardrobes of clothes. Fast forward 25 years, and my oldest daughter doesn't play with dolls like I did. It's been a bit of a struggle for us to relate on this point. Then I found a darling book at the library.
25 June 2011
Red, White and Blue
Independence Day Celebrations are coming up. I have been insanely busy this week, and can't disclose too much at this point. Not wanting to drop completely off the map, I thought I'd show my latest version for the banner wreath and seasonal pillow:
07 June 2011
04 May 2011
Fabric Flower Frenzy
We had a new niece born in our family a couple weeks ago, and along with the new sewing I've been doing for the girls and myself, I thought some new accessories were necessary.
1, 4, 5, and 8 are based on my ruffled flower tutorial. I know, I'm a snob for finished edges (and more of that to come!), but aren't some of them fun with the frayed edge?
3 and 7 are made following Tasha's fun Pointed Flower Tutorial. I got all excited to make these, and then realized I didn't have any covered button supplies. So, I made my own covered buttons with old shank buttons I had in my stash.
2 and 6 were made loosely following the Sew4Home Tattered Flower tutorial.
I think making these can become slightly addictive. Consider yourself warned. To make one into a pin, simply glue a bit of felt to the back of the flower and use a large safety pin. For hair clippies, I use my method shown for my Simple Non-Slip clippies, with Sally alligator clips.
Like this:
Hoping you're enjoying your day. The sun is finally out here in Idaho, and it is actually warm outside!
Sharing with:
04 April 2011
"Punk"-Inspired Floor Cushions
As the kids get older, the need for more seating has arisen. I bookmarked Living With Punks Floor Cushion when she first posted the tutorial last year...and even had them cut out before we moved (August 2010). I finally put them together last week.
We have really enjoyed these pillows! Perfect to...
21 January 2011
27 December 2010
Barbie Doll Clothes
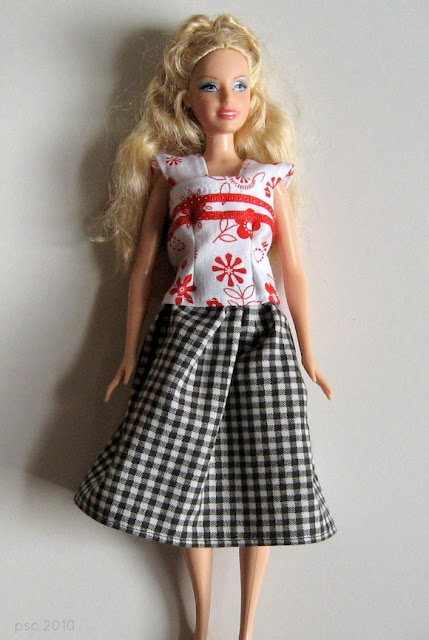
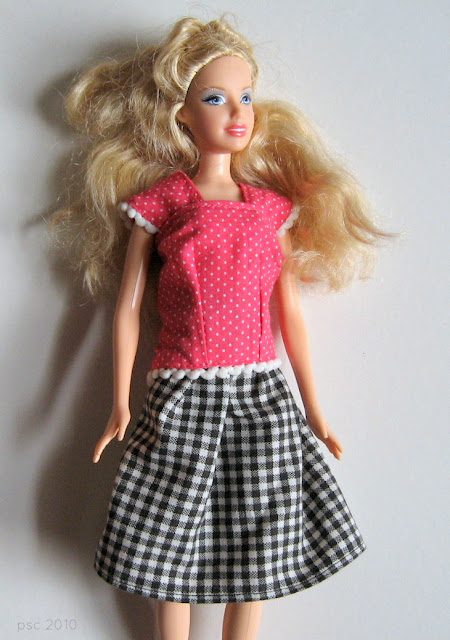
For the next little while I can finally show off all the fun handmade gifts I've done for Christmas. First up, Barbie clothes for my niece. Her mama suggested that her doll needed some new clothes. I instantly remembered Jess from Craftiness is Not Optional's tutorials, and I had all the motivation I needed. I made a dress:
a froufy skirt:
an easy skirt:
(don't you love the little tucks?)
and four cap sleeve tops: (you see two above)
I was able to use some fun vintage trims from my great-granma's stash, including the mini pompoms, and pink lace. I hope my niece loves dressing her dolly up.
Sharing with Today's Creative Blog, Blue Cricket Design, and

04 December 2010
Sewing 101 with Cally, Embroidered gift tags
Welcome to our monthly Sewing 101 feature. Today's bit of wonderful comes from Cally of Calico. I found Cally's blog through One Pretty Thing when Rachel featured her incredible Quiet Book. I've been a devoted fan ever since. She uses embroidery in many of her projects. In her tutorial, she shows us how to make embroidered gift tags.
I love simple gifts with personality. Give me a box of mac and cheese with some fantastic handmade wrapping, and it's my favorite.
A fun way to personalize your gifts is to make an embroidered tag in your own handwriting. You don't need to be an expert on embroidery; you only use two basic stitches. It's easy, I'll show ya...
- Write your message clearly on your muslin (or whatever cotton fabric you choose) with a disappearing ink pen. You can find these at any craft store in the notions section.
- Thread your needle for a knotless knot: Cut twice the length of thread you need and double it over. Then thread both ends through your needle, leaving a loop on the other end. Like this:
- Now bring your needle up at one end of your first letter. Don't pull your needle all the way through!
- Bring your needle down just a small ways in front of where you came up and pull gently, leaving a small loop on the back of your fabric.
- Put your needle through the loop and pull tight.
- Now we start the embroidery back stitch. Here is my favorite basic embroidery tutorial from Purl Bee, if you're not familiar with the backstitch.
- Bring your needle up a small ways away from the end of your last stitch, and then down into the same hole of that last stitch.
- Pull your thread tightly as you bring your needle up in the next spot, and then down into the hole of the last stitch. Continue this pattern, following the lines of each letter.
- You're going to use a french knot on the colon. Again, refer here if you need help.
- Bring your needle up right on the dot and wrap your thread around your needle two times.
- Pull your thread tight around your needle as you put it back down through the same hole you came up in.
- Pull your thread tight in the back. There it is.
- Continue to backstitch until you get to the end of one sentence, or run out of thread.
- Don't try to bring your thread across from the end of one line to the beginning of the next or you'll be able to see the thread underneath your fabric when it's all done. It doesn't look nice.
- Tie the end of your thread around the back of a couple stitches nice and tight and cut your thread leaving a 1/4" end.
- Once your ink has disappeared, press your stitches with a hot iron. Your ink will set if you don't wait, so be patient. Sometimes I have a marker that won't disappear, so I'm careful to keep my stitches on the marks the best I can to hide them. Once you do this enough, you won't even need the marker.
- Now layer your three pieces of fabric, with the canvas (or thick material of your choosing) in the middle, adding whatever embellishments you like.
- Stitch around the edges randomly and pull any loose threads to make the edges fray a bit.
- Cut any extra loose threads.
- For the tie I cut a long strip of an old tee shirt I had in the recycle pile.
- When you pull tightly on both ends of your strip, it stretches and rolls up like this:
- Do a quick stitch with your machine in the center of your tag to attach your tee shirt tie.
happy gift making!
Cally, this is awesome! Please stop by Cally's blog. I promise you'll be there for a while. You can't miss my favorite headband tutorial, the stop motion Go-Go movie she made with her boys, or just bit and pieces of her.
15 November 2010
Gifts for kids
My older kids were invited to birthday parties recently. I went to some of my favorite tutorials for inspiration.
The first gift was whipped up in 20 minutes. My son was invited to his friend's 10th birthday celebration, and I forgot until right before it was time to go.
Made with Anna's Lil Cutie tutorial, and stuffed with extra Halloween candy. Bonus! Fabric scraps from my boys' 2009 Christmas jammies.
For my daughter's friend, I made some hair accessories. First up, a headband using Cally's Easy Headband Tutorial.
I loved the green and turquoise combination.
I also made clippies, a new design I came up with:
Ruffled flowers, made from gathered ribbon and a yellow button for the center. Sewn onto green felt with snappy clips tucked inside. This tutorial from A Hoot and a Holler was helpful on making snappy clips.
Linked to Today's Creative Blog, and Blue Cricket Design, and Fine Craft Guild.

Subscribe to:
Posts (Atom)


