

I found this lovely sweater at a local thrift store.

I think someone might have shrunk it too much, because it would have fit my 7 year old if the sleeves weren't so long! Anywho, when I saw it, I immediately thought: "CARDIGAN FOR BABY!" So I snatched it up and it sat on my closet shelf for a few months. Hooray for SYTYC for the motivation to put it together!
To begin, you need another item similar to what you want to make to draft a pattern. For me, I had this gorgeous Gymboree sweater on loan from my sister-in-law.

Preliminary Step . Make a pattern.
I turned the sweater wrong side out (especially important for tracing the sleeves!), and traced the basic shape of the sweater pieces onto some newsprint.

For the main body of the sweater, I only traced half, and then folded that half over and traced it to make a complete pattern piece that was symmetrical. I didn't worry about the neckline, since I knew I was reusing the neckline of the original sweater. I also traced the sleeves so I knew the length I needed to cut the sleeves.

With the pattern pieces created, I was ready to begin.

To make a sweater into a cardigan, you'll need the following supplies:
- Your pattern.
- The sweater you are reusing.
- One yard of 1" wide grosgrain ribbon that coordinates.
- Five buttons that also coordinate.
- Matching thread for sewing and contrasting thread for basting.
- Scissors and seam ripper.
- Sewing machine.
- For optional flower, vintage lace and button.
- Hand needle and pins.
Step One. Cut your sweater using your pattern pieces.
Lay your pattern pieces over the sweater, and pin in place.

Please note the neckline and shoulder seams remain in tact. Less sewing for later!

Hang onto the original hem of the sweater...you will be reusing it.
Step Two. Sew the side seams together.
Flipping your sweater so the right sides are together, pin each side into place.

To sew stretchy sweater on a regular ol' sewing machine, I found sewing a medium zigzag stitch for the initial pass worked best. I then sewed a second regular straight stitch. I used 1/4" seams throughout this project.

The seams are a little rippled at this point. That is ok. It becomes much less prominent with the finishing.
Step Three. Add the sleeves.
With the sweater still wrong side out and the sleeves right side out, match the sweater seam and side seam together, and then pin the rest of the sleeve in place. The right sides of each piece should be together.

Sew together with a zigzag stitch first, and then straight stitch at 1/4". Repeat for the second sleeve.

Step Four. Finish the hem.
Take the reserved portion of the hem, and trim it so that it matches the width of the sweater.
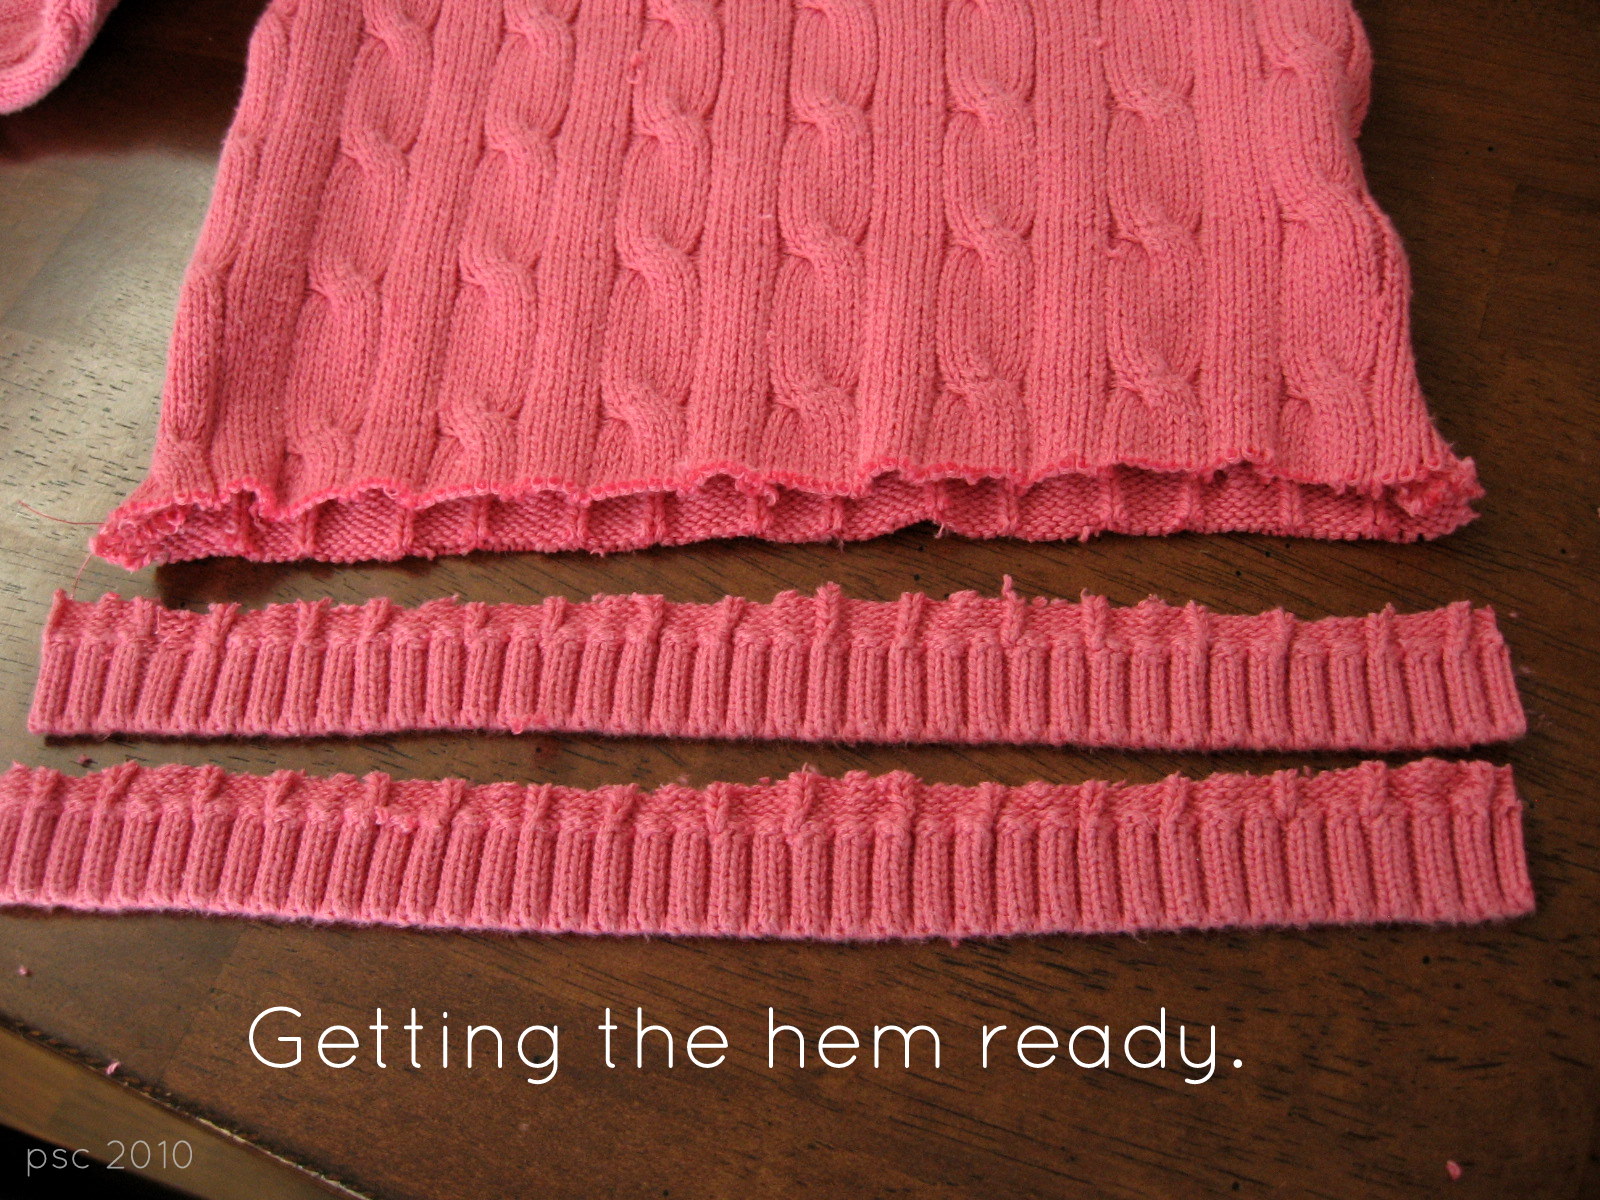


You may have to pull the sweater or hem a little to get everything to match up. That is alright. Sew together with the zigzag first and then a straight stitch at 1/4".

Step Five. Create the cardigan opening, facings, and add the buttons.
This is by far the trickiest thing you'll have to complete. Begin by identifying the center of the sweater front, and then cut that line from hem to neck, as straight as you can.

You're ready for making your button placket facings. I used grosgrain ribbon. Cut two pieces of ribbon that extend 1/4" beyond the hem and neckline, and pin in place, right sides together.

Carefully sew the ribbon to the sweater, with 1/4" seam.

Ready to make button holes? First off, using a thread that is easy to see, baste the plackets closed. I used a double threaded hand sewing needle to do so. Then, I marked where I wanted the buttons to be placed.
For my first attempt, I marked where I wanted the buttons on the grosgrain ribbon and then ATTEMPTED to sew them from the grosgrain stide...but the sweater got caught in the feed dog. So, I had to get creative to mark where to sew the button holes, since marks on the sweater were difficult to see. I used the same easy to see thread and hand needle, and basted the position of the button holes on the sweater side...like this:


I sewed the button holes using the button hole routine on my sewing machine.

Once the button holes were completed, I removed the basting threads and trimmed the button hole threads. CAREFULLY cut open each button hole. Leave the button placket basted for now. Pin the button placket closed, so it is the way you want it when the sweater is buttoned up. Then insert a pen through the center of the button hole to mark the button placement.

With placement marked, hand sew the buttons in place. I always double my thread to do so.

Almost done!
Step Six. Finishing touches.
My sewing machine has an overlock stitch. I used this to topstitch all of the seams of the sweater, including the arm seams, sides, and hem. To do so, I sewed on the front of the garment, making sure the seams were pressed toward the inside or back. If you don't have such a stitch, a lovely zigzag would work. This gives the seams strength and helps keep everything in place.


Optional Detail. Lace flower.
After I completed the sweater, it was missing a little something. I glanced up at my notions stash, and up in front was some old seam tape lace from my great-grandmother. It was the perfect color.

I sewed it with a long basting/gathering stitch on my machine with the tension on high, and it gathered perfectly. Then I folded the short edge together to make a center and wound the lace around that center. I used my a hand needle to sew the gathers together.


I have had this special button in my possession since I was a child. It's also from my great-grandmother.

I sewed it into the center of the lace flower, and then sewed the whole thing securely to the sweater.

Flower complete:

Ready to keep baby warm and stylish this fall.


Featured on Craft Gossip and One Pretty Thing, and Totally Tutorials!
Linking to Along for the Ride, Creative Jewish Mom and Under the Table and Dreaming, DillyDally and Flitter, Sew Can Do, Sumo's Sweet Stuff, V and Co, House of Grace, and Today's Creative Blog.


23 happy thoughts:
I KNEW this was yours! I voted for it :) Super cute, love how cute it is on your model!
So talented! i especially love the button on the flower which would make a super cute addition to a headband;)
This looks so adorable!! What a pretty flower.
Thanks for sharing at Saturday is Crafty Day!
Laura @ along for the ride
that turned out so sweet, thanks for sharing. I'm trying to teach myself how to sew, so I enjoy reading your how-to's (:
You are so talented and creative! I am going to follow you and see what else you are up to!
Bonnie
Wow!! that is amazing. you are so talented! that sweater is so sweet, i just love it!
thanks for joining in the giveaway fun on my blog.
hope your having a happy day.
How cute!! I love the idea of this! It'd be really fun to make an adult version... cardigans are so much more versatile it seems. I have some refashion tutorials (as well as a giveaway right now!) going on at my blog- check it out if you're interested!
http://rufflesandrosescrafts.blogspot.com/
Stopping over from Under the Table and Dreaming. I love love love this! I love to sew for my daughter and I have often repurposed my (and my husband's!) shirts for her. I am going to try this out when the weather cools down.
Chris I still can't believe you didn't make it to the finals. I thought this was the best. Just so you know I voted for you.
I thought this was the best idea on sytyc! I voted for you and I'm sorry to see you go. You did a great job!!!
Thank you, mamatamera. I appreciate your kind words. SYTYC was a fun experience, and I'm glad I did it.
This is amazing! So creative - I am super impressed! The sweater is gorgeous - I would pay top dollar for that. Thanks so much for joining the Sunday Showcase! I greatly appreciate it! Hope you have a wonderful week! ~ Stephanie Lynn
I absolutely love this! Wish it wasn't 97 degrees here so I could think about sweaters. I'll bookmark it and come back in october!
Very helpful. I tried to do somethign like this last month and didn't like my results. Next time I'll use a few of your tricks and hopefully it will turn out better.
I loved this, and couldn't believe that you didn't win. I think it was the most useful tutorial. I loved Diedre's scarf, but would definitely make this sweater first!
Great job!
LOVE this idea. As a basic knitter, this is a great work around to have awesome sweaters. Thanks for linking to Craftastic Monday!
Love this!! Great tutorial! I might use it on a sweater for me.
I love this sweater! Thanks for sharing! I always wanted to do something like this but did not know how!
Your crafts were amazing on SYTYC! I voted for you! :)
Thanks for your nice comments...
I just hope that I can keep up in session 4!
Carrie
This is a super tutorial!
this is a very thrifty idea = love the added flower too precious!
JoAnn
sweetpepperrose.blogspot.com
I love this tutorial! Now I'll be on the hunt for the perfect women's sweater! :) LOVE LOVE LOVE it!
Wow, I read the entire tutorial and thought it was great. The sweater turned out lovely, although I could never do all that work to re-purpose...I'm lazy and would probably buy a cardigan or make one...but to re-purpose takes a lot of time and skill. I am in awe of what you accomplished.
@Journeyluvr Mary Thank you! It was a lot of work, but I learned a lot in the process. :)
Post a Comment
How sweet of you to stop by. Kind words are always welcome.