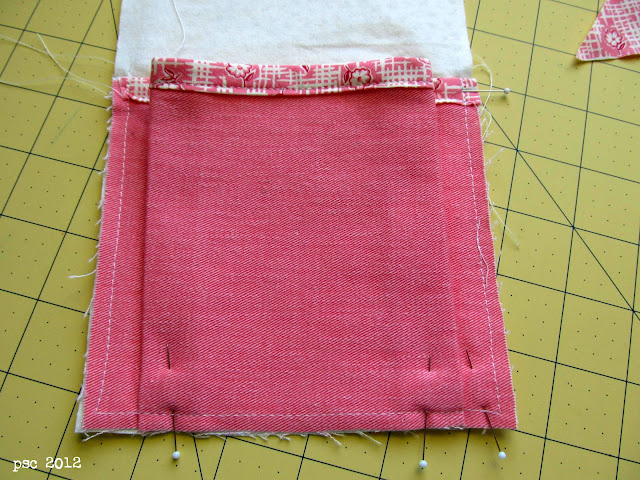
These are super simple, and give a nice big pocket for tucking treasures in.
Ready to try one?
You'll need:
- Coordinating fabric to match with your over-all project
- A scrap of bias tape
- Matching thread
- Your sewing gear...cutting tools, pins, and sewing machine. An iron and ironing board are helpful too.
Step one. Cut out your fabric. In this case, I placed a scrap of fabric on the bag side, and figured out how high I wanted the pocket to be. So, for the Boxy Messenger Bag, plan on 4" high. I wanted fairly big pleats, and added 3" (1.5" per side) to the total width.
Step two. Finish the top of your pocket. You could either line the pocket if you're using a thinner fabric. In this case since it was denim, I just sewed a bit of bias tape along the top. Easy peasy.
Step three. Pin the pocket into place. First, pin the outside edges to the bag side piece.
Next, fold the pleats evenly so that they look like the picture above. I just pinched my pleats, and pinned them in place. If you want to get technical, you could carefully measure your pleats, but really you can eyeball it and be pretty close. Pin the bottom into position.
Step four. Sew the pocket along the edge of your bag side piece. Using a seam allowance just less than 1/4", sew along the unfinished edges of your pleated pocket. Press with your iron for good measure, it helps the pleats look crisp.
Now you're ready to continue working on your bag!
Pleated pockets are a fun detail you could add to several different projects. This version is easy because it gets tucked in the lining before you sew it all together.
I hope that helps someone if they'd like to make a pleated pocket!
What types of things are you working on lately?
Featured on Craft Gossip!


5 happy thoughts:
Brilliant and helpful - pinned for future reference...
What a great idea! I think this pocket would look great on the outside of a bag too. Thanks for sharing.
I'm trying it for sure!
Thanks, looks easy enough! I'm putting this type of pocket on the front of a cross body style bag.
Thanks for such a great little tutorial! Exactly what I was looking for to put my mind at ease as I make a large bag with both inside (pleated) and outside (slip) pockets!
Post a Comment
How sweet of you to stop by. Kind words are always welcome.