

I've been lucky enough to be asked to create a baby themed project in celebration of Jess and Rory's new bundle of joy. If you've ever been frustrated digging in the bottom of your diaper bag or purse for that all important binky, this project is for you. I'm lucky enough my baby still takes and loves her binky...maybe a little too much sometimes!

So, let's get started.

You'll need:
- The template which you can download HERE.
- 12" by 6" scraps of fabric, one for the outer, one for the contrast, and one for the lining.
- A small 5" square scrap of cotton batting.
- Scraps of interfacing.
- Matching thread.
- One large matching button.
- 1/2 yard of 1/4" wide grosgrain ribbon.
- Measuring tools, cutting tools, and pins.
- Sewing machine.
Cut out all your pieces:

You'll have two big 12.5 by 5.5" rectangles, one for the outer and one for the inner. Three bottom pieces, including a circle of batting. Two 2.5 by 5" rectangles for the button tab, and two pieces of interfacing as shown, one is a 1.5" square, and the other is a 2" by 4.75" rectangle.
Step One. Preparing the pattern pieces.
Interface one of the button tab pieces, and apply interfacing to the outer fabric as shown:


Pin the batting to the outer bottom piece. Quilt them together. I just started in the center, and circled out as I went.

Lastly, make your button tab. With wrong sides together, sew three sides of the tab. (Leave a skinny side open for turning.)

Turn the tab right side out, and press.

Press the opening closed, and then mark your button hole and sew as you did for the outer pouch edge. I like to put the button where I want it to be, and make two marks at the top and bottom as a guide.

Step Two. Sew the outer pouch.
Sew the outer pouch into a cylinder. Put the short sides, right sides together, and sew at 1/4".


You're ready to attach the bottom to the sides.


Step Three. Sew the pouch liner.
The pouch liner is sewn the same way as the outer pieces were. Sew the rectangle into a tube with a 1/4" seam. Sew the bottom to the tube, with the exception that you want to leave a space at the bottom for turning.

Step Four. Putting it all together.
With the outer pouch still wrong side out, turn the liner right side out and slip it inside the outer pouch.


Sew the along the entire perimeter of the bag, at 1/4" seam.


Time to the liner closed. Fold the opening in, matching the folds to the seam depth as the neighboring seams. Topstitch the entire liner.

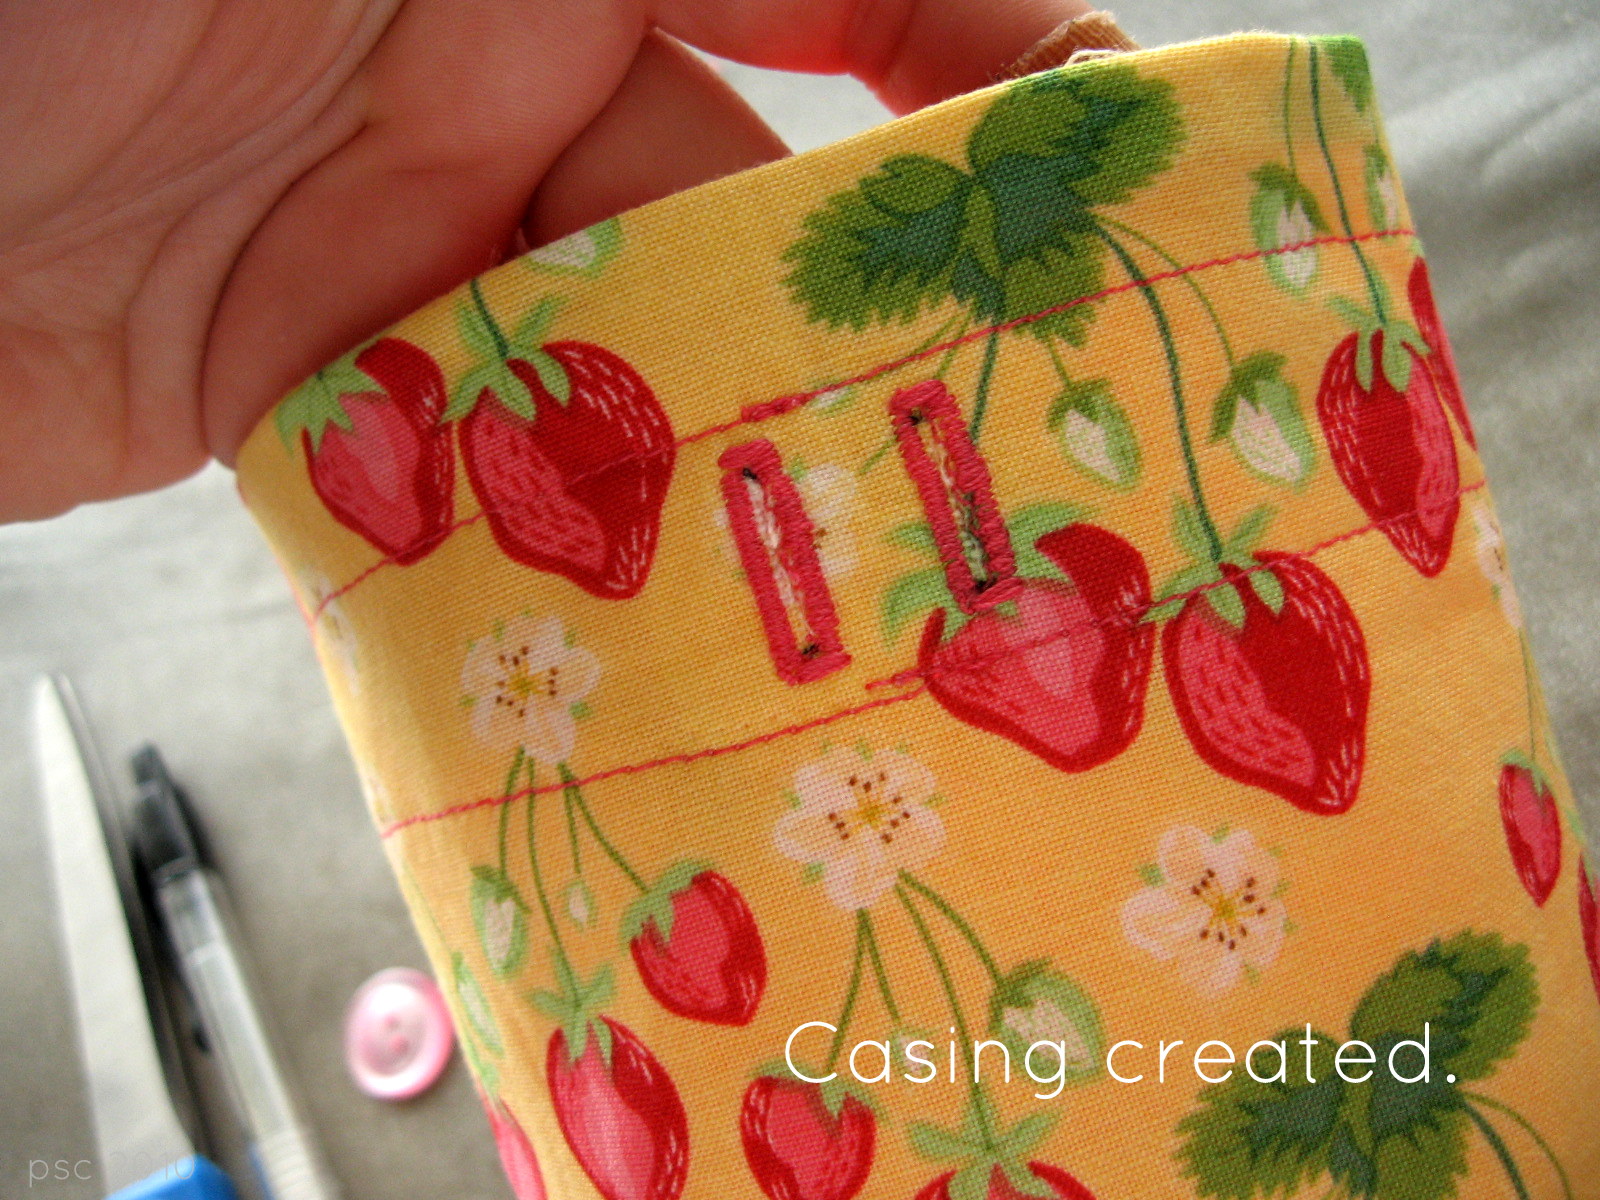
Tuck the liner into the pouch, and sew two straight seams to hold the bag together and create the casing for the ribbon. I used my seam gauge as a guide, and sewed one seam just below the button holes, and another just above.
Grab the button tab.


Sew the button in place. It should be centered on the seam, about 1/2" from the bottom of the pouch.

I like to place a toothpick or large pin under the button as I sew it on, this prevents me from sewing it too tightly. I also wrap my thread around the button stitches before I tie the knot.
Final step, thread the grosgrain ribbon through the casing. I like to use a safety pin to hold onto the ribbon as I push it through.


Congratulations! You've completed a sweet little pouch. It's washable, as fashionable as you want it to be, and would also be a great treasure keeper as baby grows up.


As seen on Craft Gossip and One Pretty Thing.
Linked up to Tatertots and Jello, Along for the Ride, Creative Jewish Mom, Under the Table and Dreaming, Sew Can Do, The Girl Creative, Sugar Bee, Blue Cricket Design., Delicious Ambiguity, Women Who Do It All, and Tea Rose Home.
And Somewhat Simple Baby Ideas.


11 happy thoughts:
What a great idea! When my kids were babies, we were forever loosing their soothers! One of these little bags would have come in very handy. Fantastic tutorial too, thanks!
What a sweet pouch! Thanks for stopping by my blog and for your comment! :) Happy 4th!
I love this! My little guy has been found with two pacis in his mouth at once too :) Thanks for stopping by and leaving a comment so I could find your little spot.
Chris, great minds think alike! When I owned a custom bag shop, we made these almost exact things for pacies. Out of necessity they were born. Another use, if yours is sized just right, someone said they make perfect water bottle holders for strollers too. :) Also, I have the same pictures of my babies with their double pacies. The same brand too. :) Thanks for stopping by my neck of the woods too.
I love that idea! What a clever way to keep a pacifier handy and lint-free! I'm sure my mother could have used something like this - there are a lot of pictures of me with the double-pacifier. :)
What a cute, cute idea. I have a brand new grandbaby and I will have to tell my daughter about this. Great way to keep up with the binky Ü
Oh that pic of her with TWO cracks me up! Great idea! Too bad I am past the baby phase.
Thanks for the great idea, I think I will make a few of these to have ready for baby showers.
Great idea, and great tutorial, thanks so much for sharing on Craft Schooling Sunday! My daughter used to have five on a chain, and she'd switch them in the middle of her sleep!
Hope to see you again next week!
wow.. Thanks for the tutorial! The pouch looks so cute!!
Thanks for a tutorial that will be a great help. Hope to sew one for our new granddaughter. Can you tell me the diameter of the bottom pattern piece?
I never have any luck trying to download from that Scribd place. I have nothing to upload and hesitate to download that file viewer for fear it will cause a problem.
Thanks for the help.
P. Frederick
hellopf@yahoo.com
Post a Comment
How sweet of you to stop by. Kind words are always welcome.