I was invited to decorate a table for a dinner my Church's
women's organization held a few weeks ago. The theme for my table was purses. So, I used a couple of my
Clementine Purses for the centerpiece, and then needed to come up with something for napkins. I like to keep things relatively simple, and have something I could use over and over. The result, which incidentally is a great scrap fabric buster, is this tutorial. You do need to know how to sew a button hole, but other than that this is a great beginner-intermediate sewer project.
You'll need two different coordinating fabrics. You'll also need coordinating thread, two matching buttons per napkin ring. Gather your fabric cutting tools (I love my rotary cutter and ruler), and then enough ric rac for the number of rings you are making. I always have my seam ripper handy, too. For sewing on the button, have a hand needle and toothpick handy.
Let's begin!
First, cut your fabric strips 2.5 inches by 6.5 inches, two for each napkin ring.
If you are using ricrac, cut 6.5 inch pieces, two for each napkin ring. I took all the pictures using the ric rac method, got the first one finished, and realized I didn't have enough ricrac. (Typical!) So, I made mine without ricrac. It's totally up to you.
Now, to make sure you place your ricrac correctly, I recommend ironing in 1/4", along each side.
This makes sure you center your ricrac correctly.
If you want, you can now baste the ricrac in place, or if you're in a hurry, just pin everything together.
Ready to sew?
I like to use the safety pin to help me turn the fabric tube right side out. It gives me something to hold onto.
I used two different thread colors to coordinate with the different fabrics. Just be sure you have the matching fabrics and threads in the right position. I.E., the fabric on the bottom should have it's matching fabric in the bobbin case. Finish topstitching. Now, you're ready to add the buttons.
Hold the button where you'd like it, and make two marks at the top and bottom of where the button is to be placed. These marks will be where your button hole tack bars will be sewn.
For this project, I used a different color thread in the bobbin so that the threads would match the fabrics better. Open your button hole with your seam ripper or small sharp scissors.
I just make a small mark with my pencil through the button hole, and try to center it as much as possible. You will be sewing both buttons on at the same time, but begin with one.
Sew a couple stitches with double thread. Then, push your thread through to the other side of the napkin ring.
Before you get any further, follow this tip:
Now, carefully sew both buttons simultaneously. The holes should be aligned so that you go up through both, and down through both. Sew at least 4 times around both buttons.
Now, remove the toothpicks, and wrap your thread around each button's "shank".
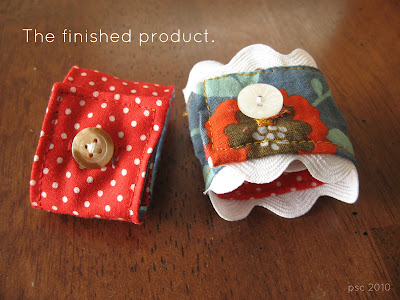
I like the look of the napkin rings with both the ricrac and without. I'd love to see what you come up with! They were fun to use for our Easter dinner, and will grace our table whenever I feel like doing something a little out of the ordinary.
{SQUEEK!} This tutorial was featured on
U Create AND
Craft Gossip AND
One Pretty Thing AND
luvinthemommyhood AND
Totally Tutorials, AND
Crazy Domestic!
I'm linking up with
Women Who Do It All,
Blue Cricket,
Just a Girl,
Somewhat Simple,
Favorite Things Friday,
KoJo Designs,
Under the Table and
Craftaholics Anonymous Support Group.


