28 April 2010

Baby's new duds

I promised to show Baby with her new clothing. Here are the best photos I could snap. She has decided she doesn't like being a model.

She does love her skirt, but will only wear the headband for about 10 minutes at a time.  The Puppet Show Tunic/blouse fits perfectly.  I love it on her even more than on the hanger.

If you haven't yet, please head over and vote for your favorite at SYTYC.  So many great ideas to pick from...I'm still not sure which one to vote for yet!  Be sure to hop over using the button on the side bar.  Voting is open until late Friday night.

26 April 2010

Modern Quilt Wall Art Tutorial

To my mind, a traditional quilt is pure folk art. Check out the amazing quilts at the American Folk Art Museum. When considering they were each hand-pieced...they are miracles to me. Especially the double wedding ring quilt pattern. The intersecting circles are visually stunning.

For my entry for Week 1 of SYTYC, I wanted to create an homage to the double wedding ring quilt. I chose traditional colors, red and white, but wanted to simplify the process and make the aesthetic available to anyone. So, here we go!

24 April 2010

Modern Quilt Entry

This is the view from my front door now. 
Did you guess I made the "modern quilt"?  Thank you to each who voted for me in last week's SYTYC voting...it was a nail biter until the last day.  I was amazed at the great things all the ladies made.  It would be so hard to choose.  Won't it be exciting to see what everyone comes up with next?
I'll post a tutorial on Monday.  Enjoy the rest of your weekend. 

23 April 2010

Baby's Tunic

Well, I've got Baby's Puppet Show Tunic finished, and Sister's is almost done. There was a big learning curve, but I think I pulled it all together. I decided I didn't like the length of the tunic, and shortened everything by 3 inches, so really it's a blouse. I love the details.
Sweet little buttoned cuffs.
Really cool way to finish a hem.
View from the back...pardon the wrinkle.

I can highly recommend Oliver + S! Their patterns are well written, and have some really cool techniques I'd never seen or used before. (This is completely my own opinion...they have no idea who I even am!)

Now, off to finish Sister's blouse, and my project for SYTYC week 2, if I make it!  


I'm linking to: Thrifty BA, The Train to Crazy, Someday Crafts, and Somewhat Simple and Along for the Ride, and Under the Table and Dreaming, The Girl Creative and Kindred Spirit Mommy.

21 April 2010

Stress requires chocolate...and peanut butter

Chocolate is good for the soul.  I know this for a fact.  It also has all kinds of goodness for your health wise, if you have a small bite of dark chocolate.  I'm not sure the following post qualifies, but here goes!

I was checking out my favorite links at some linky parties last week, and ran across Peanut Butter Brownie Bites from Me and My Pink Mixer.  I had to try this idea out. 

She recommends using your favorite brownie mix, but I have to make brownies from scratch using Hershey's Best Brownie recipe.  I went to their site, and they don't have the exact same recipe anymore, so here it is for posterity's sake:

1 c. butter
2 c. sugar
2 teas. vanilla extract
4 (yes) 4 eggs
3/4 c. unsweetened cocoa powder (my fave is Saco)
1 c. flour
1/2 teas. baking powder
1/4 teas. salt

Melt butter in a microwave safe bowl.  Stir in sugar, vanilla, and eggs.  Beat well with a spoon/whisk.
Thank goodness we get eggs from my in-laws' chickens!  One of the perks of country living.

Now, add cocoa, stirring carefully with a spoon.  Last, stir in the flour, baking powder, and salt.

Normally you pour this goodness in a 9x13 pan, and bake at 350 degrees for 30-35 minutes.  However, this time around, you'll put a heaping teaspoon of batter into each cup in a mini muffin pan.
Bake for 8 minutes at 350 degrees.  Then, using a 1/4 teaspoon, make a small indentation into each brownie bite.  Soften up a 1/4 c. peanut butter in the microwave, and pour the PB into the indentation.  Garnish with chopped Reese's peanut butter cups...and voile!

Yummy chocolatey bitty brownies to assuage any stress or angst. 
By the way, this version makes approximately 60 bitty brownies.  I'd know for sure, but the hubs had a few "tastes" of the batter.  :)
I'm almost finished with the first tunic, and will show later this week.  

19 April 2010

Playing with paint

Last week, the hubs and I had to stop at our local building supply for some parts and supplies as we begin some minor fixes for our home and yard. While we were there, I saw that they were closing out one line of paint, and it was 40% off! I've had a bee in my bonnet to paint stripes in my laundry room, and this was the incentive I needed. Who can pass up a quart of Behr paint for $5?  I chose a lovely aqua blue because of this fun print:

I've had this laundry label for a long time. It came from a fabric bag that once held laundry detergent, that was repurposed to bundle quilting fabric, that I've saved for my laundry room "someday".  So, with label finally framed as inspiration, I started the tedious part of painting...the preparation.

I decided vertical stripes would be best to make our laundry room feel bigger. I chose to paint the long wall behind the washer that still needs upper cabinets/shelves (long story)...and then felt the wall behind the bench needed stripes too.  I used my cheapo laser level to keep the stripes straight (a must!) and then decided to vary the distance between the striped for fun.  So, the paint stripes are 6" wide, and vary between 8" and 12" apart.  I put little scraps of tape in the "don't paint" zones to be careful.  I also added some glaze to the paint so that it wasn't super opaque or too thick compared to the rest of the wall.  (The original paint is a lovely ivory/light-light yellow called "light shaft".)
Here's the bench area in progress:
Results for now:
The big wall...and two of my favorite things, my LG washer and my big laundry sink.

The bench area...with coats back up.  The cubbies underneath house shoes.  Behind the bench is the hamper.

My next project for this room would be to make a cushion for the bench.  I don't know when I'll get to that.  It's on my someday list.  If I can find a good price, I'd like to use Heather Bailey's Pop Garden ZigZag in Blue.  For now, I LOVE the color in this room.  It makes the room feel bigger, and I smile every time I walk in.  That's a good thing when your facing a pile of dirty jeans!  


18 April 2010

Thank you, Jen


Jen at Sewin' Mama gave me an award this morning. She even said I was a "diva"...which really shocked me. I feel so far from anything like that! But, I am grateful she thinks I have fun ideas, and that so many of you have joined me for this adventure. I'm thrilled we're up to 140 followers.  I never imagined that many of you would want to know what I'm up to.  Seriously.  I am grateful.  So, keep spreading the love, and hang in with me while I attempt SYTYC.  I have some fun ideas to share...even if I don't make it far, I'll post them here.  Happy Sunday!

16 April 2010

Tips for using purchased patterns


I have been doing some "me time" sewing this week. Not sewing for me, but working on a project I've wanted to do for a long time...and trying to do it the right way... AND watching one of my favorite movies, Pride and Prejudice. 

I bought this pattern, called the Puppet Show Tunic, last summer from Oliver + S. I loved the design, and I am also a sucker for pretty packaging.  It's definitely a more difficult pattern, and had techniques I wanted to learn.  (I also keep saying "it's a tyoo-nick" to myself from the line in "Night at the Museum 2".)

I'm still working on things, but I wanted to share a few tips and tricks.  First, to preserve your pattern investment, trace the size you want to use onto tissue paper.  This preserves all the sizes so you can use the pattern multiple times...and if you're into ebay, patterns that are not cut are a lot more valuable. 

Second, to save money, if the pattern isn't offered in the size you want, but is close, you can actually draft your own using the original as a guide.
The pattern only came in size 2T-5...but Big Sis is a 7.  I used the same proportions, and made my own pattern.  To do this, you need a good ruler, like a quilting ruler.  Measure the differences between the different sizes for the pattern piece, then add that to the pattern and keep the same shape.  I wouldn't jump more than three sizes.  In this case, I made a size 7 from a size 2-5, and it worked great.  Plus, using tissue paper, I had the ability to start over if it didn't work. 

Another tip, use pattern marking tools.  I inherited these tracing tools from my great-grandmother.  I love using something she did...she was a fabulous seamstress. Way better than I am.  I have her tracing paper, a tracing wheel, and the "tack-it"   It allows you to mark both sides of a piece at once, as long as the tracing paper is folded so both sides have tracing medium.  This is ideal for marking darts and button placement.

Finally, an important step that I usually skip...make a "muslin".  Make a mock up of the garment you are wanting to make, using muslin or some other cheap fabric.  I used a sheet I found at our local thrift store.  This lets you play with the pattern, identify places that may be difficult or need some tailoring...and especially in this case, make sure I drafted the pattern in the right size for Sis.
 You can see I had a hard time keeping straight which side was "right" when I was sewing...white fabric on both sides is tricky!  The good news, the pattern will work well for Sis...and I've now cut out the real thing on the real fabric.
In case your wondering, the fabric is from Anna Maria Horner's Chocolate Lollipop line.  
I'll post photos when I'm done. 


Featured on Craft Gossip, and Sew Mama Sew!
Linked to Get Your Craft On, Women Who Do It All, and Someday Crafts, and Sew Mama Sew's Call for Sewing Tips.

14 April 2010

Reversible Fabric Napkin Ring Tutorial

I was invited to decorate a table for a dinner my Church's women's organization held a few weeks ago. The theme for my table was purses. So, I used a couple of my 
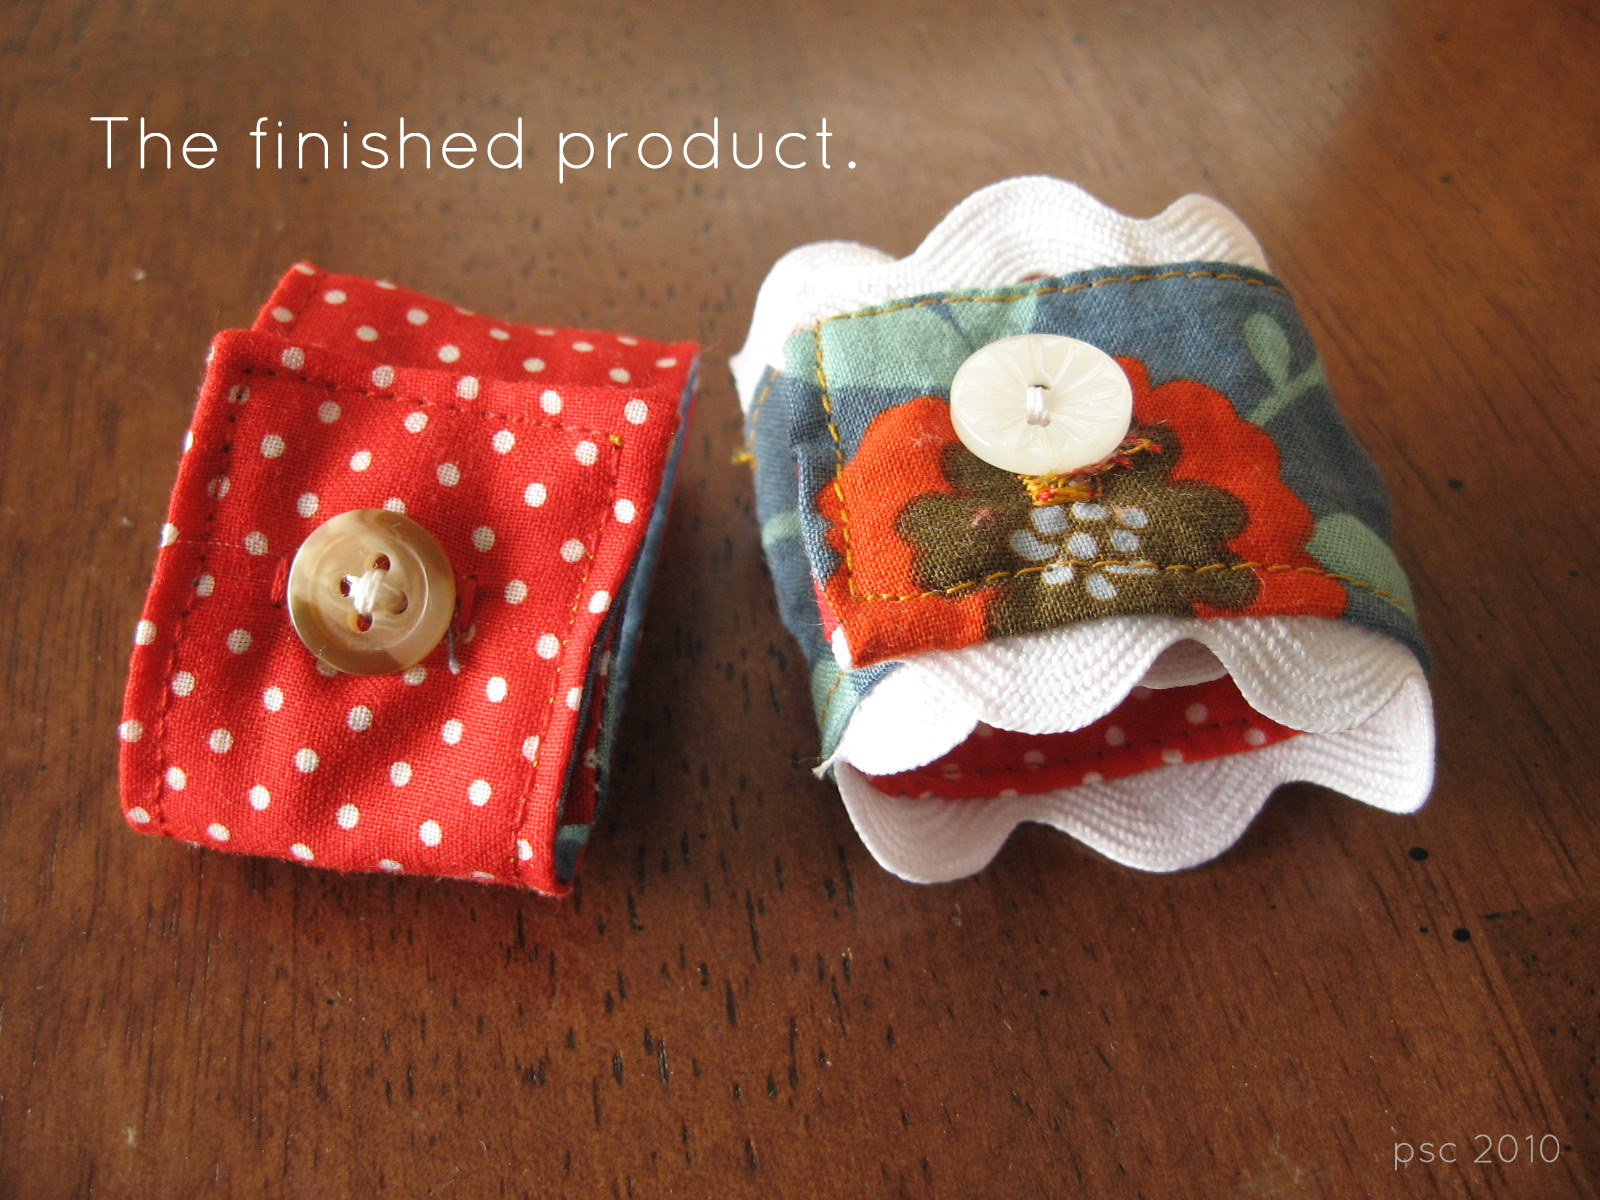
Clementine Purses for the centerpiece, and then needed to come up with something for napkins. I like to keep things relatively simple, and have something I could use over and over. The result, which incidentally is a great scrap fabric buster, is this tutorial. You do need to know how to sew a button hole, but other than that this is a great beginner-intermediate sewer project.


You'll need two different coordinating fabrics.  You'll also need coordinating thread, two matching buttons per napkin ring.  Gather your fabric cutting tools (I love my rotary cutter and ruler), and then enough ric rac for the number of rings you are making.  I always have my seam ripper handy, too.  For sewing on the button, have a hand needle and toothpick handy.

Let's begin!
First, cut your fabric strips 2.5 inches by 6.5 inches, two for each napkin ring.
If you are using ricrac, cut 6.5 inch pieces, two for each napkin ring.  I took all the pictures using the ric rac method, got the first one finished, and realized I didn't have enough ricrac.  (Typical!)  So, I made mine without ricrac.  It's totally up to you.


Now, to make sure you place your ricrac correctly, I recommend ironing in 1/4", along each side. 
This makes sure you center your ricrac correctly.
If you want, you can now baste the ricrac in place, or if you're in a hurry, just pin everything together.
Ready to sew?


I like to use the safety pin to help me turn the fabric tube right side out.  It gives me something to hold onto.

I used two different thread colors to coordinate with the different fabrics.  Just be sure you have the matching fabrics and threads in the right position.  I.E., the fabric on the bottom should have it's matching fabric in the bobbin case.  Finish topstitching.  Now, you're ready to add the buttons. 
Hold the button where you'd like it, and make two marks at the top and bottom of where the button is to be placed.  These marks will be where your button hole tack bars will be sewn.


For this project, I used a different color thread in the bobbin so that the threads would match the fabrics better.  Open your button hole with your seam ripper or small sharp scissors.

I just make a small mark with my pencil through the button hole, and try to center it as much as possible.  You will be sewing both buttons on at the same time, but begin with one. 
Sew a couple stitches with double thread.  Then, push your thread through to the other side of the napkin ring. 
Before you get any further, follow this tip:

Now, carefully sew both buttons simultaneously.  The holes should be aligned so that you go up through both, and down through both.  Sew at least 4 times around both buttons.
Now, remove the toothpicks, and wrap your thread around each button's "shank".


I like the look of the napkin rings with both the ricrac and without.  I'd love to see what you come up with!  They were fun to use for our Easter dinner, and will grace our table whenever I feel like doing something a little out of the ordinary.


{SQUEEK!} This tutorial was featured on U Create AND Craft Gossip  AND One Pretty Thing AND
luvinthemommyhood AND Totally Tutorials, AND Crazy Domestic!
I'm linking up with Women Who Do It All, Blue Cricket, Just a Girl, Somewhat Simple, Favorite Things Friday, KoJo Designs, Under the Table and Craftaholics Anonymous Support Group.

12 April 2010

Limitless imagination is a good thing.

I just had to put this photo in twice.  It's my favorite.
My little boy loves robots, as you now know. He is also REALLY into Iron Man, Transformers, and anything else that requires a metal exoskeleton. He's tried to pretend he's in an Iron Man suit by wrapping himself in blankets with socks on his hands. The other day, he decided to outfit Woody in another version of an Iron Man suit.

First, Woody was dressed in one of little boy's shirts and then his winter parka.

Helmet 1.0 was just folding the hood over...but then Woody couldn't see anything.

Then, inspiration struck!

The block sorter would be perfect.
Helmet 2.0, Hi Woody.  (Said in a distant voice like in Toy Story 2.)

Now, he's ready to fight his way out of some cave in Afghanistan...or is it just a maze of toys in the family room?

Love the feet hanging out the bottom?  Little boy explained that he had to be able to walk out of the cave.


Yes, we've let him see Iron Man.  No, he doesn't watch the whole movie.  Yes, he also has an Iron Man action figure who has lost a hand through his many adventures and battles.

I will consider myself a lucky mom if I can keep nurturing these amazing seeds of creativity.  In the meantime, they are also very entertaining. 
Print
Related Posts Plugin for WordPress, Blogger...