

Ok, gals. My cute sister-in-law found an adorable PB Kids changing pad for me at DownEast Outfitters for $5 right before Baby #4 hit the scene. It looks like this:


I loved it so much, when she had a baby almost exactly on year later, I made her one like this:


I love this changing pad for several reasons. First, it can be tucked in the diaper bag, but you don't have to haul your whole diaper bag into the bathroom. Second, it is big enough that you can completely cover the changing area...who wants to put their precious baby on unknown surfaces? Third, big pockets hold lots of stuff like diapers, wipes, and creams. Fourth, it is completely washable.
So, when we had a family baby shower over the weekend, another sister-in-law suggested making one. I decided, what the heck, I'll make it a tutorial, so here you go.
Before we begin, let me warn you that terry cloth is a bugger to work with. It's stretchy and it leave little pieces of fabric EVERYWHERE in your house (especially if you have hard floors!) Second, I have rotten luck applying bias tape unless I follow the same method I use for quilting, so that is what I'll show you here. If you have some tips on directly attaching bias tape, please share!
So, here we go!
As always, gather you materials:

You will need:
A straight edge ruler and rotary cutter are also helpful. I made my own bias tape, but you can use store bought as well.
Always be sure you prewash your fabrics!


- 1/2 yard of cotton quilting fabric
- 1/2 yard of white terry cloth
- 1/2 yard thin quilt batting
- 7 yards of 1.5 inch bias tape
- matching thread
- pins, scissors, a measuring tape, and a small radius cup for rounding corners
A straight edge ruler and rotary cutter are also helpful. I made my own bias tape, but you can use store bought as well.
Always be sure you prewash your fabrics!


You'll need to cut the following pieces:
For the main body ("body") of the changer
- 18" tall by 22" wide rectangle of fabric
- 18" tall by 22" wide piece of terry
- 18" tall by 22" wide piece of batting.

For the head portion of the changer, ("head")
- 9.75" tall by 11.75" tall piece of fabric
- 9.5" by 11.75" piece of terry
- 9.5" by 11.75" piece of batting
For the pillow,
- 15" by 10" rectangle of terry
- 15" by 10" rectable of batting

For the pocket:
Cut a 8" tall by 23" wide piece of fabric. The bottom two corners are rounded.
Note: if your fabric has a direction, make sure the fabric is facing down...opposite of where the body portion is going. See the one I made my SIL. When it's folded, the fabric is going the wrong way.

For the handle, cut two pieces of fabric and one piece of batting 14.5 inches long, 1.75 inches wide.

Step 3. Make the pillow.
Fold the terry together with the batting sandwiched inbetween. Zigzag stitch everything closed. Next, pin the bias tape to the pillow as shown, leaving ties out as shown.

Sew the bias tape to the pillow using your sewing machine and a medium stitch. Only sew the portion that is attached to the pillow at this time.

Sew the bias tape to the pillow using your sewing machine and a medium stitch. Only sew the portion that is attached to the pillow at this time.

Fold the bias tape measure over, and pin so that the opposite side from where you sewed is covered. Hand sew using a blind hem stitch. My favorite way to do this is using this tutorial.

I want you to hand sew the ties, also.

Lastly, on your machine, sew the bias tape with a top stitch, 1/8" from the edge. Lately, I like to use a decorative stitch. Do what makes you happy.

I use the same method for applying all the bias tape in each of the following steps. So, if you have questions, keep referring to these photos.
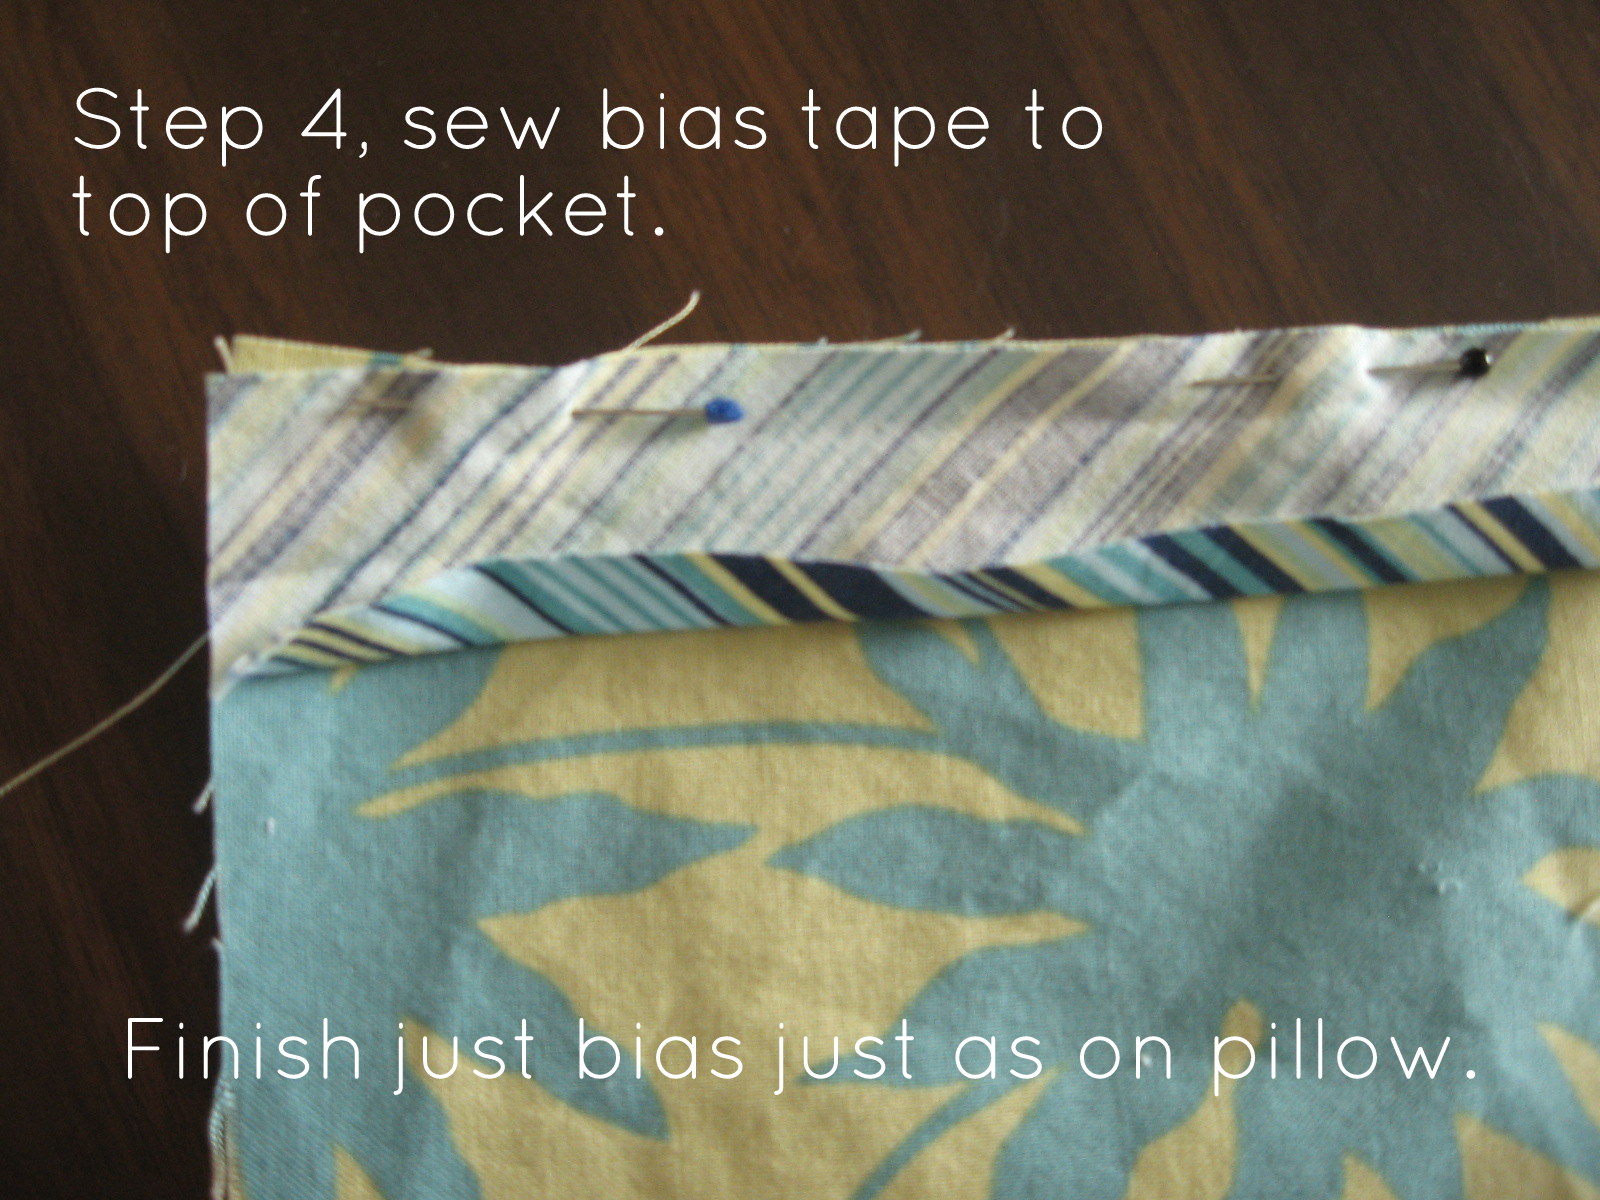
Just cut the bias tape to the same length as the pocket, then pin to the right side of the fabric as shown. Machine stitch. Flip over, and hand stitch the other side, then topstitch.

Set aside until ready to complete the body of the changer.
Step 5. Assemble the handle.
Pin all three layers of the handle together, and zigzag stitch the edges. When finished, apply bias tape to each long edge, as shown above.

Set aside for now.
Step 6. Create six ties.
From your bias tape, cut 6 (six) strips 10.5 inches long. I hand sewed each closed with the baseball stitch, then topstitched each.

Step 7. Prepare the head portion of the changer. Pin all three pieces together, and zigzag stitch. The straight edge should not be sewn together. Set aside for now.

Step 8. Prepare the body.
First, sew two straps to the fabric of the body. Decide which long side is the bottom. From there, measure up 7 inches from the side and 6.75" from the bottom. Mark this place. Repeat for other side.

Pin the straps, so the length is reaching towards the top.

Sew in place using a little box shape. Your box should be about a 1/4" wide and long.
Pin the fabric, batting, and terry together. Use lots of pins to hold all the layers together.

Make sure the fabric is smooth.
Flip the body over, and pin the pocket in place along the bottom.

It should be on the same lower edge as the ties.
Carefully sew the entire body together using a zigzag stitch.

Now, sew the pocket dividers.

Measure 7.75 inches from the side. Mark the location with pins, and then carefully sew a straight line down with a medium straight stitch. Make sure you sew with a thread color that matches your fabric.
Now, we're ready to put it all together.

Lay the pillow at the center of the body, with pockets at the bottom. Use pins to hold two ties in the same place the pillow ties are. Move pillow to the side, and baste the ties to the body.

Next, center the head piece with the body. Pin together, with terry cloth portions touching. Be sure to fold the fabric of the head out of the way. Sew the head securely to the body.

Now, pin the flap closed, and topstitch.

Step 10. Attach the handle.

Place the handle so that one edge is directly over the head seam, and the other is towards the head portion. Topstitch in place along each bias tape, sewing in 4 inches towards the center.

Step 11. Add last set of ties.
The last set of ties will be placed at the top of the head portion. Each tie should be 1.5 inches from the sides of the top. Baste in place.

You can verify the right placement by folding the changing pad, and making sure the ties from the head portion match up to the ties you sewed to the back of the changer.

Step 12. Bind the changing pad.

Pin the bias tape in place, and sew to the changing pad. This time you will be covering the entire perimeter, and will need approximately 90 inches. Follow the same steps as when you put the binding on the pillow.
For a finished look, as you are pinning the bias tape in place go about one inch beyond where you began. Be sure to fold over the end of the bias tape as shown, and you will have a beautifully finished edge. Top stitch all the binding into place.


You like my little "PSC" tag? I got a little OCD and embroidered it on some grosgrain ribbon.
Now, you are almost done!


To fold the diaper changer, fold the sides of the body in to the middle. Then, fold the bottom to meet the head and fold the head over the body, and tie to close.
Congratulations! I, of course, would love to see what you create! Please email me, or upload to the Pickup Some Creativity Flickr pool.
UPDATE: I had one lady ask how you place a baby on this contraption, and to be more specific on folding. So, here are a few more photos.


This is how baby lays on the changer. First fold, is sides toward the middle.


Happy sewing! This tutorial was featured on Craft Gossip, One Pretty Thing, and Sew Mama Sew!
I'm linking here:


25 happy thoughts:
Thank you! This blog post will be advertised on CraftCrave in the Handcraft category today (look for timestamp: [15 Feb 01:00pm GMT]).
Seriously, I love mine!!! I'm sure your sister in law will love it too! You're the best.
This project makes me very excited to try, especially since I know I've got a lot of diaper-changing days in my future. I have a request though--would you please help me visualize how it's used? When you're using it for changing baby, does the pillow stay in the same place and you just clear out the pockets so it's flat for baby to lie on? Or does baby go horizontally on the long terry-cloth panel? I looked on PB Kids to see how they were used but it looks like they don't sell them anymore. Even better reason to make my own. Thanks for the tutorial! (sorainima@gmail.com).
Wow, this is great! Thank you for sharing this useful pattern.
This is so great! Thank you so much for sharing.
Tutorials and pattern amazing!
Thank you for sharing it with all of us!
Thanks for sharing, will have to give this one a go for all the baby showers I have coming up soon.
Wow, This is one amazing baby gift!!!! Thanks so much!
Love it! Sure wish I had one of these, oh, 18 months ago. Maybe I'll luck into the DEO $5 version to finish up my diapering. Great baby gift!
Nicely done! I've posted a link. Thanks for sharing.
Thank you to those of you who have posted! I'm sorry I didn't have an email address to respond to some of you personally. It is so nice to have your responses and kind words!
Just wondering how much it cost to make, material wise? I LOVE that you can pick your own fabric and use it to make the ever so cute fabric covered wipe container, car seat tent or nursing cover!
This is a wonderful tutorial! I am going to work on this for a baby shower I'm attending this weekend. :) Thank you for taking the time to post it.
Heidi asked about material costs. Here's my response from the email I wrote to her:
It totally depends on the fabric you choose. The terry cloth runs about $6-12 a yard right now, and then your pretty designer fabrics are about $8/yard. You'd need 1/2 yard of each, plus another 1/2 yard of a coordinating fabric for the bias tape. Plus, your batting which you would buy in a bag, and have enough for other projects. Costs would vary from 12-15 dollars, I'd estimate.
The way you had the instructions on the pictures was fabulous!!!
Hello! Thanks for stopping by my blog! I really like your blog as well. I love this tutorial! Thank you for it! Also, I love the ruffle clips in your Etsy shop! What a cute idea!
Great instructions with pictures. Do you have a tutorial for a cover for a contour changing pad? I can hardly wait to make this for our first grandson due in May.
Claudia, I don't have a tutorial for a contoured changing pad. My suggestion would be to take a cover that fits the pad you want to cover, turn it wrong side out, and use that as a pattern. Thrift store towels could make a great, absorbent, soft cover that is inexpensive. You'd just have to trim it, to size, sew corners, and add elastic to the edges with a zig zag stitch.
I hope that helps!
This is how I do bias tapes for the kinds of changing pad I make: I do the same with zig zagging the edges, then I use binding clips (hair snap clips) to hold the bias tape in place with the fabric sandwiched in between. Steam and press around the curves with an iron to make it lay flat. Then, I make sure to sew on the side of the tape that is a little narrower so that it catches the longer bottom edge underneath. (With homemade tape, just make sure to fold the tape not quite in half. Commercial double fold tape comes this way.) I also use a walking foot which seems to help with shifting and bunching. Hopefully I explained it well enough :) Thanks for the tutorial on this pad. Also, on making a contoured pad cover like someone wanted, McCalls had a commercial pattern 4897 (out of print now) that I've used to fit my changing pad I got at Babies R Us
Very cute! I'm glad you included the picture of how to put the baby on this, because I wasn't sure!
How cute! I was wondering how tall and wide the finished product is?
@KendraThe finished size is approximately 27" by 22". Thanks for asking!
Thanks for sharing! I just made one and love it! One suggestion -- hobby lobby's fabric is always ridiculously uneven and therefore, you have to cut a lot off to straighten, so I should have bought 3/4 yards of each. Also, I used PUL waterproof fabric instead of the terry cloth in case baby "squirts" so I can wipe it off. Thank u again! :)
@Party ChickThose are some great suggestions! Thanks so much for sharing. :)
I just made one of these for a friend. She loves it! The only change I made was to sew the out side ties all the way through the layers.
Post a Comment
How sweet of you to stop by. Kind words are always welcome.