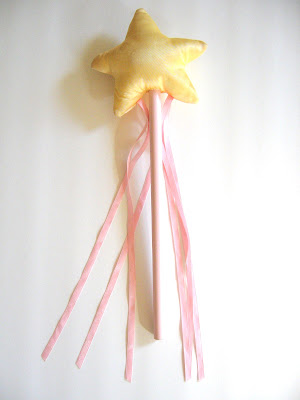
Inspired by a fun pretend play fairy princess kit my daughter received several years ago, I made a matching wand for my baby. Here's the inspiration wand:
Want to make one for the little fairy in your life? Here's the how-to.
You'll need:
- Template, download it HERE.
- Fabric scraps, two 5"x5" squares
- Sparkly fabric paint and spray paint of your color choice
- 1/2" ribbon, grosgrain or satin
- Matching thread
- 1/2" diameter dowel
- Cluster fluff type stuffing
- Fabric glue or hot glue gun
- Sewing tools; including scissors, seam ripper, pins or pattern weight, and sewing machine, and helpful to have...pinking shears, my new favorite tool.
Step one. Paint. My inspiration wand's star was shiny satin, but I needed to use materials on hand. So, I painted gold colored fabric with sparkly fabric paint. I think the result was almost better than the original.
I used a sponge to make sure the paint was very thin.
I spray painted the dowel my chosen color. It took three coats to get the best coverage. Let everything dry well.
Step two. Cut out your star and streamers.
Using the template provided and right sides of the fabric together, cut out your star.
You'll need six streamer ribbons, each about 14" long. Make sure the ends are cut on a diagonal.
Step three. Sew and stuff your star. With right sides together, pin your star together, leaving an opening in the bottom for turning, your dowel, and the streamers. (I almost forgot the streamers...and had to unturn, pick out, and add them!)
After you sew your star, you'll want to trim and grade your seams. Easy peasy version, just pink the edges!
Boy, did I feel sheepish when I realized I'd forgotten the all-important streamers! I had to pick out the seam, and then carefully pin the ribbons in place. When you make yours, pin the streamers in the seam before you sew. I'd pin the ribbons into the center of the star to keep them out of the rest of the seams.
The more you stuff, the better the star will look.
Step four. Insert and glue the dowel into the star. I used fabric glue for my star, but hot melt glue would work well too.
Project complete! I'm so happy with how the wand turned out, and so is my baby.
Featured on Craft Gossip, One Pretty Thing, and IShare Crafts, and One Pretty Things' Gifts for Girls. Also featured on Totally Tutorials, Lily & Thistle, and Today's Top 20.
Featured on Sew Mama Sew.
Linked to Freckled Laundry, Just a Girl, Tatertots and Jello, Along for the Ride, and Creative Jewish Mom.


23 happy thoughts:
My daughters will love these! What a great idea!
A-dorable!! i love the stuffed star!
So lovely!!!!
Catarina
http://nolugarquechamocasa.blogspot.com
That is just precious.
This is one of the best tutorials that I've seen.
I love your clear pictures and the writing on the photos.
Note to self: learn how to do that!!
And I love the end product (and, more to the point, so would my daughters!.
I following you!
Sarahx
SO CUTE! I love that you added some sparkle to it, and that it's SOFT!
Really nice pictures of your tutorial!
My niece would love this!
I would never have thought of a stuffed star, but what a great way to use up a small piece. I also love that spray paint.
Cool! Now I know what to make my niece for a fun gift this holiday...if I can wait that long :P
Those are so very cute! My girls would love them!
Too cute!
m ^..^
So adorable! Love that you used sparkly paint on the star. Any little girl would love one of these.
I did a very similar project with my kids at camp-- but we used chopsticks for the stick and used felt pieces that we hand stitched together. Everyone loved it!
Nice idea! Great tutorial.
Thats sooo cute! My little sister would love this. How well does it hold up though?
So very sweet! I could use one of these magic wands just about now to clean up my studio and take care of the laundry! Thanks so much for sharing on Craft schooling Sunday and great to see you again! all the best!
Stephanie, my daughter has had the pink wand for five years, and it has held up beautifully. As long as you glue the dowel in well, I see no reason why the one I made wouldn't last as long with normal use.
I think Edyn needs one of these. Thanks for an awesome tutorial & for linking up to air your laundry Friday, sweet friend!
Hugs,
Jami
I want to bop everyone on the head with these! Adorable! When I have kids one day, these will be their weapons of choice ;) I kid!
This is great! I featured you today on Today's Top 20!! I'd love if you stopped by!
Amanda
todaystoptwenty.blogspot.com
I've included your post in a featured list on fairy princess parties on my blog, The Handmade Experiment. Check it out and thanks for the great inspiration! http://wp.me/pkcUM-L4
Emily
Hi,
Me again! :) I used your tutorial, although I used a sparkly dance fabric knit for the stars, for my daughter Quinby's third birthday. It was a fairy princess theme. I thought you might want to see how they turned out! A little wonky, because my I don't have a printer so just cut each star out free style, but I like that look. Thanks so much! The wands were really fun to make!
http://emilyflippinmaruna.wordpress.com/2011/07/17/fairy-princess-party-or-quinbys-birthday-party-2/
Post a Comment
How sweet of you to stop by. Kind words are always welcome.