

I have a favorite oven mitt. I've had it since we were married over 11 years ago. However, it's showing it's age.

Am I the only one who's accidentally placed a mitt on a still hot but turned off ceramic cooktop? {crickets chirping} I wanted one just like it, and I thought maybe someone else might as well.
Let's get started!
Before you begin, download your template HERE.
Gather up your materials.

- Outer fabric, a fat quarter is perfect.
- Lining fabric, a fat quarter also
- Matching double-fold bias tape, one yard
- Insulbright batting
- Quilt basting spray
- Matching thread
- Fabric marking pen
- Sewing tools; including scissors, seam ripper, pins, and sewing machine.
Step one. Lay out your fabric into a sandwich. The outer fabric first, then the batting, shiny side down, and finally the lining fabric.

Repeat, making sure the fabric will fit your template in reverse. You will have two halves of an oven mitt, each a mirror of the other.
Step two. Lay out something to protect your work surface, like newsprint. Get out put down your lining fabric, and spray lightly with the basting spray.


Step three. Trace your template onto each sandwich's lining. 

Make sure you flip the template so that each side is a mirror of the other. You are making one oven mitt. :)
Step four. Quilt the fabric sandwiches. I used a wavy stitch, and sewed in a fairly straight pattern every inch to inch and a half.

I stopped just passed where the tracing line was.

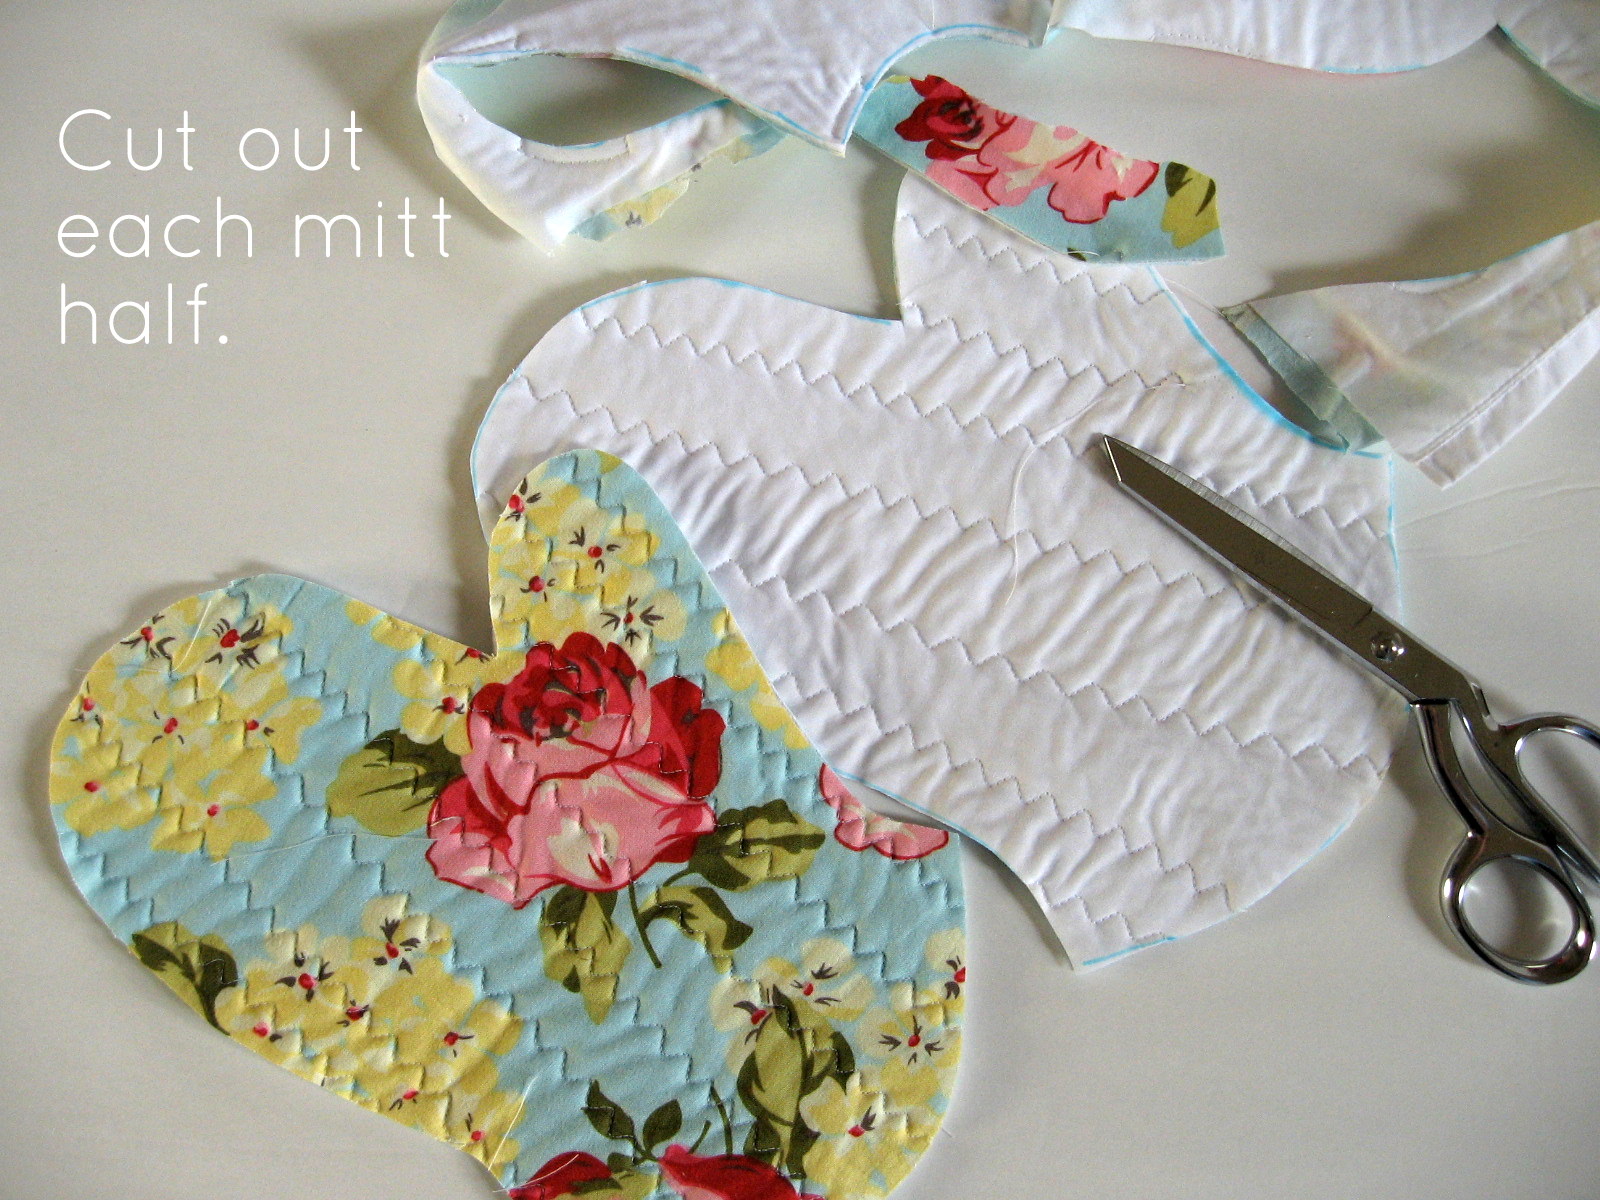
Step five. Following the template line, carefully cut out each mitt piece.
Step six. Add the bias tape. First, add a little hanger.


To finish the bottom edge, apply bias tape to the bottom of each mitt half. I struggle to get bias tape placed like I want it, so I am really careful. I first pin and sew the tape to the outer fabric.

I fold the tape over so the bottom is covered and baste in place.

I then stitch the tape into place and remove the basting stitch.


Step seven. Sew the two halves together. First, pin the halves right sides together.

Stitch together, being very careful around the curvy parts, 1/4" seam allowance.

Don't forget to clip the curve where the thumb meets the rest of the mitt. I did, and when I turned it the first time, everything pulled funny.

Finally, finish all your edges. If you are lucky enough to have a serger, go for it. For the rest of us, a tight zigzag will be fine.

Turn the mitt right side out. You made need to use a wooden spoon to push out everything, as the fabric may be a bit stiff.

Well done! These are really not too hard to make...and make kitchen chores so much more fun. Enjoy.
Featured on Craft Gossip, One Pretty Thing, and I Share Crafts, and Cut Out and Keep.
Sharing with Blue Cricket Design, Tea Rose Home, and Freckled Laundry, and Just a Girl.


26 happy thoughts:
Great tutorial, Chris! I love the wavy stitch you used for the quilting. I've never used basting spray, but I'm thinking I might need to get some.
I can't seem to get your template to come up. It says the link does not exsist.
Great tutorial Chris. I really like the use of the wavy stitch too! I have very elementary quilting skills (not great with curves), but this might be a good one to start on.
@Cat
I'm sorry that link wasn't working. I just tried it, and it worked ok. It may be your internet browser. If you have any other troubles, let me know. :)
Another really great tutorial! Great idea to use the spray adhesive!! I love it...
how cute...well done! So great that you can personalize it to fit your kitchen or others for gifts - mmmm ideas!
www.northerncottage.blogspot.com
Great tutorial! Thanks for sharing!
www.laforcebewithyou.com
Yes please, I'd love a fabric sandwich!! :-) ´Mmm.... :P
I love your tutorial, thanks so much for sharing!!
Love,
The Creative Muslimah @ www.thecreativemuslimah.blogspot.com
so cool chris, this does look like a great shape! I will be making some, for me and my girls play kitchen!!! really, please hold me accountable to that. :)
Love this!
Very pretty - love the fabric. :)
You really do post incredibly clear tutorials. I love 'em! Thank you so much for putting this together. My oven mitts are also in a sorry state. Oh, the shame!!
Sarahx
I love it! What a great tutorial. Thanks for sharing!
Yeah I love that fabric too! I can see how that would make any job more fun. Hope you had a wonderful holiday season!
Once my machine is out of storage, I will definitely be trying this quilt basting spray! I have had a few "favorite" mitts lost to the stove burner.... I usually try to keep using them, and forget I've burnt the tip off, and burn myself on a hot pan!
~Amanda
The mitts are beautiful! Mine could definitely use some sprucing up. Thanks so much for sharing the how-to!
Great job on your tutorial. Oven mitts are the best, and having one in custom fabric sounds great!
Another vote here for someone who has never used basting spray. It sounds great!
Hi, stopping by from the Freckles Laundry air your textiles party. Great tutorial! I really like your fun fabric choices and you make it look so easy!
ok, I can't tell you how cool this is cause my mitt looks just like yours and is getting even more trashed by the minute.
Thank you for the tutorial, Chris! I threw away my oven mits when I bought this little silicone grippers. How dumb that was because those silicone grippers don't work well at all. The heat from a cookie sheet goes right through them! Thanks for sharing with air your Laundry Friday!
Hugs,
Jami
Thanks for sharing Chris. I have also linked to you on my Freebies blog...hugs Khris
Thanks for the tute!! Im in a swap and needed some inspiration. Found this tute on pinterest and just followed along!! I linked to you on theharvestquilter.wordpress.com
Hey Chris, I just made one of these, and your tutorial was awesome. I'll be blogging it on Thursday probably, and linking back of course. Been needing to make one of these forever. So glad I found your tute. :)
I made one of mits today and it was so easy. It came out great. I made my own binding instead of buying it. I am making these to go with a casserole carrier that i made. Really happy i found this pattern.
I made this pot holder today and it came out great. I am making this to go with a casserole carrier for Christmas. I am happy to have found this pattern.
@ruth brusseauRuth, I'm so glad you liked the pattern! I think homemade binding is the best, too. :)
Post a Comment
How sweet of you to stop by. Kind words are always welcome.