I am very late to the whole cell phone thing. I had one from college years, but finally returned it to my parents and was happily cell free for a while. However, with the move and needing to communicate with my husband, we broke down and got our own cell phones. I even send text messages to him. It's great, like slipping notes in class behind the teacher's back. I know, welcome to the 21st century, Chris.
When I made my purse, I realized that I would lose my phone in the bottom and never find it when I needed to. I saw Larissa's adorable wool cozy on mmmcrafts, and wanted to make one to coordinate with my purse. I took pictures as I went, so now you can make one too.
You will need:
- Larger scraps of fabric
- Fusible fleece.
- Coordinating thread.
- Twill tape.
- Sewing supplies.
Step One. Determine the size you need, and cut your pattern pieces. My cell phone is approximately 3" by 5". So I doubled the width, and added 1/2" for seam allowance, and then added 1" for the height. Thus, I needed two rectangle pieces of fabric that were 7" by 6". Cut a rectangle of fusible fleece that is slightly smaller than your two rectangles. I cut mine 6.5" by 5". Finally, cut your twill tape to length. I used 16" because I wanted to be able to tuck the cozy inside my purse. So to recap, you need:
- Two rectangles, one for the outer piece and one for the lining. (Mine are 7" by 6").
- One smaller rectangle of fusible fleece. (Mine is 6.5" by 5").
- 16" of twill tape for a leash.
Notice that the fleece is smaller...this allows the seams to not be too bulky. If you do piece the outer rectangle, quilt the top to the fleece by some quick "stitch in the ditch" seams.
Step Three. Assemble the cozy.
Be sure to clip the corner as shown. This will reduce bulk and help you have a sharp corner. Turn right side out.
You can baste the tape by sewing a short seam 1/8" from the top.
Step four. Prepare the lining. Take your lining piece, and sew a seam along the long edge.
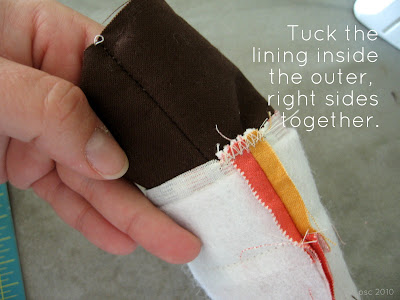
Turn the outer piece wrong side out, and tuck the lining inside, so that the right sides are together.
Be sure to trim those loose threads!
To close the lining, tuck the open end in 1/4".
Sew the edge closed with a seam 1/8" from the edge.
Step five. Final touches.
You could just stop here, but I like to secure the lining by sewing along that top edge. Plus, it's fun to have that lining poking up don't you think?
This little number has been a life saver. I always can find my phone when I need it. Now to get faster at texting....
Featured on Craft Gossip, and IShare Crafts.
Linked to Someday Crafts, and Somewhat Simple.


8 happy thoughts:
So cute! Thanks for the tutorial.
so cute! great tute!
How do you have the patience to take pictures as you go? That is always the hardest thing for me.
Super cute and love the tutorial :)
I like this alot, and if I could just tweak it a little to make it work for when I go to the gym, or am driving in the car. I was just thinking about the car thing today, funny, how now I came upon this. I would love for you to link this up to my new party, Thanks, and great blog!!!! Bella.....
Your tutorials are great! Really!
The best tute I've ever READ ... makes perfect sense, step-by-step ... you should be a teacher :-)
I need to do one of those, at least if I'm going to have anything left of my phone. Thanks for sharing ... I've posted a link.
Post a Comment
How sweet of you to stop by. Kind words are always welcome.