This was such a fun project to tackle...especially since I don't do a lot with paper these days. Thank goodness I had the motivation of SYTYC to try. I'm so pleased with how the diorama turned out.
I will show you how I made my diorama, but please be sure to see Larissa's beautiful dioramas at mmmcrafts for more inspiration. For the uninitiated, her blog is an amazing feast for the eyes. Check out her house diorama, little red diorama, winterscape diorama, and family clothesline. Amazing.
You will need:
- A shadow box frame. This one is 8x10, and was purchased at Michaels.
- An 8x10 photo of the house you want to create. I just printed a copy on my ink jet.
- A variety of cardstock in colors of your house and yard. Try to get a variety of textures, too.
- Craft foam. I used the thin and thick stuff found at Michaels.
- Adhesives. I used glue dots, a permanent glue stick, and tacky glue for this project. (I found the glue stick wasn't really sticky enough, though.)
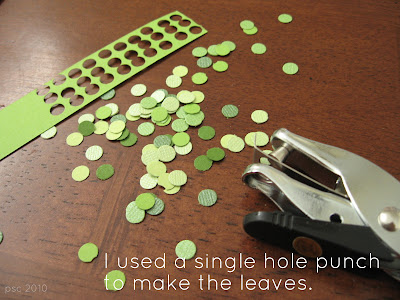
- Cutting tools, including an exacto knife or two, scissors, and a scrapbooking straight cutter if you have one. I also used a single hole punch.
- Measuring tools/straight edge. (I used my quilting ruler)
- Pencils
- Scratch paper
- and plan on making a trial diorama for practice, which you see in the photo above.
Preliminary step, divide your house into layers. For mine, the bottom layer is the main rectangle of the house and roof. The second is the first gable, the third is the porch. Then determine how many layers you want for the landscape. I have three, for the inner lawn, the driveway, and the outer lawn.
FIRST LAYER
Now, for the fun part. Using scratch paper, sketch the basic shapes of your layers. Keep it simple.
Next, cut out your basic shapes, and then lay them on the photo to make sure you are fairly accurate.
In this case, I had to adjust the roofline a little, and make sure my lines were straight.
I used my straight edge to make sure my lines were straight, and then carefully cut them out. Using your photo as a guide, mark on your background paper where the house will be. Apply your adhesive, and then glue the main house piece to the paper. Repeat for the roof. Finally, add details like rain gutters, attic vents, and windows. For the house corners/rain gutters, I cut a long, thin white piece of paper so they were all the same, and then cut lengths for each corner.
I carefully marked the edges of the windows, and cut them out with an exacto knife.
Sorry for the blurry photo...late night crafting. I wish the edges were straighter. I think it is something I could improve with practice. I glued each window trim to the window, and then using the original photo as a guide to placement, glued the windows in place.
SECOND LAYER
Using the same technique of tracing the shape, making a scratch paper model to make sure of accuracy, trace and cut out the next shape. In this case, it's the front gable. Once the cardstock is cut out, mount it on the thin foam to create the feeling of depth. I used a different type of cardstock so the difference between the main house and the gable were defined a little more.
Once the shape is cut out, you'll want to trim the foam from the back so it doesn't show easily.
With the original photo as a guide, glue the gable in place, and add the window. I also made paper shutters in the same manner as the corners.
I used the single hole punch to make the decorative attic vent. I also cut triangles to make the blocking on the roofline.
THIRD LAYER
The third layer for my house is the porch. I traced the shape of the porch as I did the other features. this was also backed with foam.
I then went back and cut out the opening, and added the details like the columns, and concrete floor.
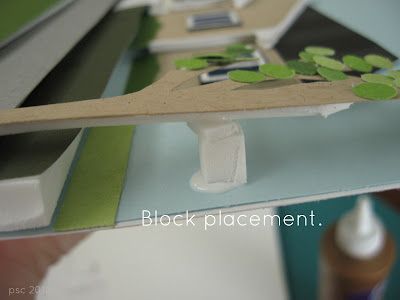
I had to add additional foam on the part of the porch not supported by the gable so it would be stable.
Finally, I glued the rest of the windows and front door, trimming out as I did the other pieces. I used the original photo as the guide for the size of each detail. I did make the columns a little beefier than in real life so they would be strong enough on their own. There is a front step and door knob, if you look close. Here's the photo again for reference:
I included some shrubbery shapes along the base of the house, and a grass layer to the sides of the house.
FOURTH LAYER
Landscaping. I traced the shape of the lawn against the house, and included the whole rest of the photo. This is important, because you are still building up your layers.
I like that the landscaping up against the house is still visible, but the new layer has a depth all its own.
FIFTH LAYER
For my house, this is the driveway. I used the same tracing method, and picked a gray paper to represent the gravel.
I used the thin foam, rather than thick on this layer. I also cut out and installed the sidewalk and step (still using the original photo as a reference). I used a tiny bit of foam under the step to give it depth.
SIXTH LAYER
For the last layer, I did defined the driveway with the foreground grass. I also designed two trees. We actually have trees, but right now they are still young and somewhat small. I drew bigger trees for dramatic effect. I traced out one tree shape, and then cut out two that were mirror images of each other.
To create leaves, I had three different colors of green cardstock that I cut out with the single hole punch.
The nice thing about this particular cardstock is that it had two different textures. It helped to give the leaves the feeling of depth.
Once the trees were leafed out, I glued the trunks to the backside of the grass layer, and then backed all of it with the thin foam.
I had to do some careful cutting to not have the foam visible from the front of the trunks. I then glued the layer in place. The trees needed a little more support.
You are essentially done at this point. Hooray!
Before I framed the diorama, I decided to back the whole thing with one more layer of foam, to give the background more strength.
Lastly, I framed my work. This particular frame came with tiny wood separators, which also added to the look of depth, and made it so the first layer wasn't up against the glass. If your frame doesn't have that feature, you made want to make an additional small "frame" of foam and paper around the perimeter of your work.
I had a difficult time getting good photos of the diorama in the frame because of the reflection off the glass. The whole things looks a lot better in person. This photo was taken with the flash on, and you loose a lot of the perception of depth.
Happily displayed in our home:
Linking to: The Girl Creative, Sugar Bee Craft Edition, Life in My PJs, Someday Crafts, Women Who Do It All, and Blue Cricket Design.
Featured on One Pretty Thing, Be Different...Act Normal, Craft Gossip Scrapbooking, Totally Tutorials, and 50 Handmade Gift Ideas.
Also featured on Apartment Therapy's Re-Nest, and Curbly. Thank you!
My Favorite Project of 2010! linked at Tatertots and Jello.


21 happy thoughts:
that is awesome!!!
wow that is soo pretty! thanks for the tutorial! in the direct photos it dint look much, but in the last photo that diorama becomes a star!
btw thanks for visiting my blog and leaving such a nice comment.
very cool Chris! It reminds me of being back in design class in college. Lots of cutting :) I might have to try one of these!
Man, you are super talented! I would never have thought of that. I really love it!
Just popping over from Life in my PJs...
This is such a detailed tutorial - thank you! The end result is gorgeous!
I L-O-V-E this! Thanks for the great tutorial. I'm definitely adding this project to my "To Do" list! :)
This is completely awesome! I definitely want to make this! Thanks for the great tutorial.
Awesome! Can't wait to make one!
What fun tutorial. Thanks for sharing.
So cute, I really LOVE this, and your tute is so detailed. I can imagine many cool applications for this, thanks so much for sharing! Off to see what other awesomness your blog has! :)
I LOVE this... thank you for the tutorial! I think I might even be able to do this because of your great tutorial!
thats really cool!!! love it so much! :)
One of the coolest ideas I've seen. I love it! I just don't think I have the patience to do it!!!!
very nice. id love to make my parents farm house (we are a wandering military family so our rentals might not be that interesting) but id add the word 'home' across the bottom in the grass.
That is so cool!! I would love to "try" and do this when I move!!
Thanks for linking up to my Pajama Party! Please join me next week again =)
~Ela
What a great idea -- would make a wonderful housewarming gift!
Grrrr.... Here I thought I had my Christmas gifts all bought or made already. But now I'm positively agog over your diorama and wondering how many of these I could (realistically) make before the 25th. The possibilites for personalized gifts for home owners is endless: My parents recently sold the family farm, my in-laws have retired to a cottage on the lake, my brother just bought his first home....
@LisaI am glad you found this project...it really turns out beautifully, and you can do it in an afternoon.
What a fantasic project thanks for the idea :-)
This is such a great tutorial. I followed it and had no problem creating my own. It turned out great.
Here's the link: http://lovepeoplelikethings.wordpress.com/2011/02/14/home-diorama/
Fantastic project and so well explained
Cheers from India
Sonia
cardsandschoolprojects.blogspot.com
Post a Comment
How sweet of you to stop by. Kind words are always welcome.