

In this tutorial, you'll learn how to make your own pattern, and add a lovely contrasting cuff...and an optional drawstring. This is a long one, so hang in there with me!
First of all, gather your materials. You'll need:
A pair of pants in the size you are wanting to make PJ pants in
Paper to trace your pattern onto
1-1/2 yards of fabric
Contrasting fabric, about 1/4 yard
Remnant of second contrasting fabric
1/2" elastic for waistband
Matching thread
Sewing machine, scissors, pins and needles, seam ripper, pen, and iron.
Helpful: rotary cutter, self-healing mat and ruler.
Please note, I always sew my seams at 1/4". That way I waste less fabric.
Step One.
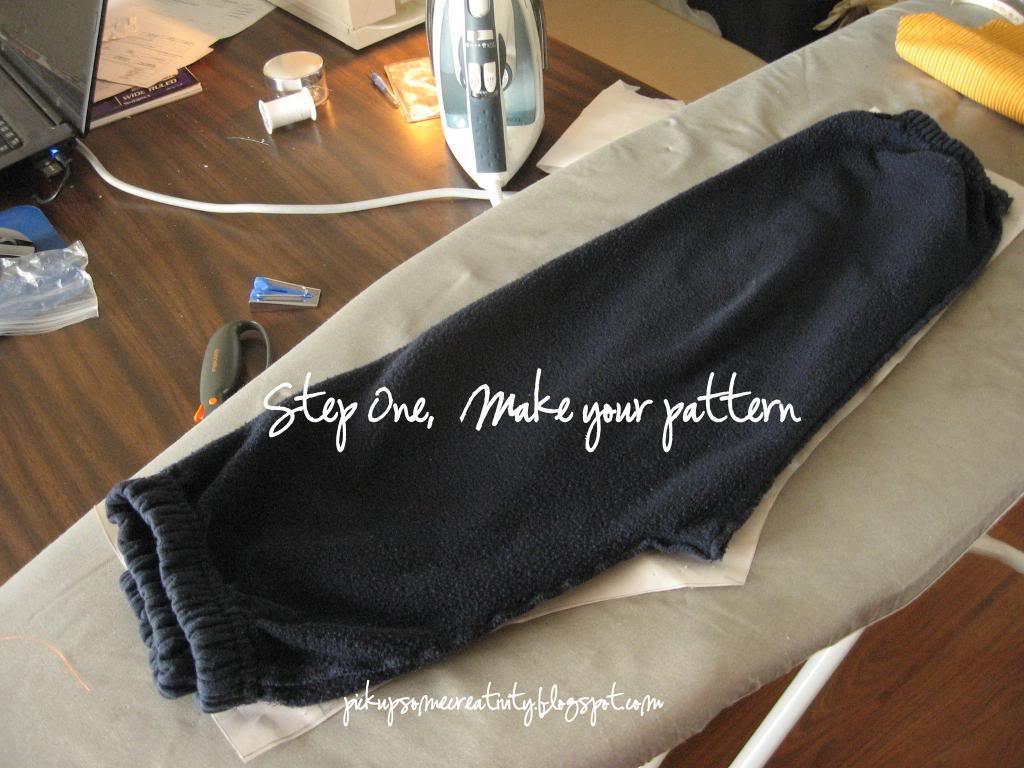
Layout the pants you're using on your paper, wrong side out. Trace the pant shape, leaving about 1/2" all the way around for seam allowance. I leave the outside seam as a straight line, and use that as my "cut on fold" line. You'll want to add about 2 inches at the top for the waistband casing. This way, you should have only one pattern piece for your pants rather than two.
Step Two. Cut out your pants.

You should have two pants pieces, each cut on the fold.
Step Three. Using your original pants, determine what your finished length should be.

Step 4.

Trim the pant length if necessary to accommodate your contrast cuff. In this case, I wanted to add a two inch cuff, and so I trimmed the PJ pants two inches above where the original pants hem is.
Step 5. Cut out your contrasting cuffs.

Determine the width of your pants and cut the corresponding width in your contrasting cuff fabric. Then, cut the length of the cuff you want. In my case, I wanted a two inch cuff, so I cut a 4.5" length to include seam allowances. Remember, you must do each step twice, one for each pant leg.
Step 6. Prepare the cuff for sewing.

You iron this up to demarcate where you will be sewing in the final step. Be sure you are ironing the bottom of the fabric, especially if there is a direction in your fabric.
Step 7. Create the contrasting strip for each cuff.

Using the same width as your pants and cuff, cut two 1" strips. Iron each of them in half.
Step 8, with cut sides together, pin the decorative strips to the top of the cuff pieces.

Step 9. Sew the strip to the cuff using a zig zag stitch, repeat for each cuff.

Step 10. Iron the cuffs in half.

Step 11. Open the cuff, pin to the pant matching the top of the cuff (with the decorative strip) to the end of the pant leg.

Step 12. Iron the top of the cuff, pressing the decorative strip up.

Step 13. Sew each pants piece together in front and back, as shown here:

You're half way there.

Step14. Sew the inseam together. This includes the cuffs. Sew from the edge of the cuffs all the way around.

Finish the seams in your favorite fashion, whether you zig zag stitch or use your serger.
Step 15. Make the waistband casing.

To make a casing, first you iron down 1/4". Then, measure down another 5/8" again, and iron. Sew around from 1/8" the edge, leaving about 1" opening to thread though the elastic.
Now, if you wish to add a drawstring, stay tuned, other wise skip down to threading through the elastic.
Optional Drawstring:

Decide which side is front or back, (they are identical at this point), and iron in a small patch for reinforcement. Place the patch under where the waistband will fold down. I made the patch with a scrap left over from the pants a small piece of heat n bond lite.

Sew the button holes where you mark them, and then use your seam ripper to open the holes.
Now, sew the waistband casing down as before, still leaving the 1" hole for inserting the elastic.
Step 16. Determine what length of elastic you need. Ideally, you measure the waist of the person you are sewing for and add 1" to allow room to sew the elastic together. If you don't have a model, use the pants you used to make your pattern, measure the waistband and estimate the length.

Now, if you are adding the draw string, make your drawstring. Start with the same length you had for the elastic and add 20 inches for enough length to tie together. You can do this by making a bias tape and sewing it together.

Then, thread the drawstring through the button holes, using a safety pin just as you did for the elastic.

Ok, now back to the final steps for our tutorial:
Step 17. Pin up the cuffs.

Here's where ironing that 1/4" on the bottom of the cuff comes into play. That 1/4" fold line should match up with the seam where the cuff is sewn to the pant leg. Do this for both pant legs. The neat thing about this is that you end up with a very finished looking pant leg, and minimal seams to rub on your leg.
Step 18. Last step!! Using your best blind hem stitch, hand sew the cuff closed on each pant leg.

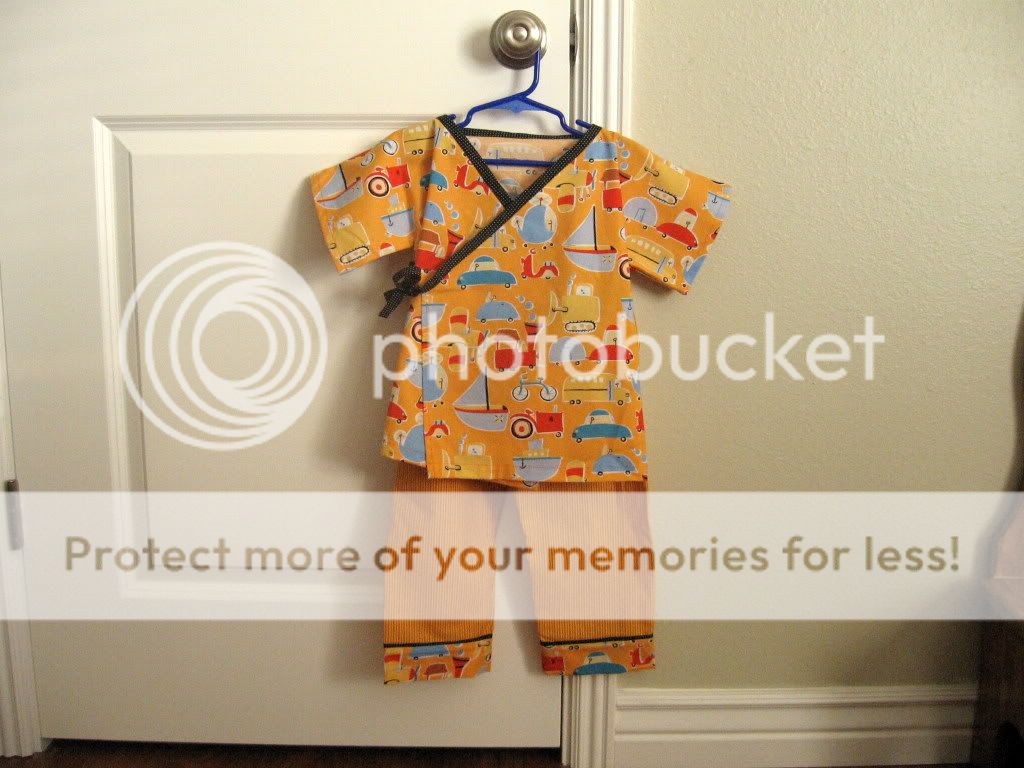
And, now you're done with a darling, personalized, and snazzy PJ pant that you've created and personalized.

Now, if you wish, you can make a matching top. I recommend the Kimono top by Habitual. You'll end up with a sweet PJ combination like this:

Or this:

I hope this wasn't too difficult, and that you enjoy making some fun PJs for a little one in your life.
Best wishes,

This tutorial was featured on Craft Gossip, One Pretty Thing, and Totally Tutorials.


7 happy thoughts:
Chris,
Thanks for this! I love your combinations. I am cutting out pajamas this weekend. I hope they turn out half as cute as these!
SO cute! I will be featuring this!
So adorable! My kids would love theses! Thanks for linking!
thank you so much for this! i'm a nightgown person myself, but everyday since it has gotten cold, i have said "i need pajama pants." i'm gonna have to make an adult pair for myself. :)
Great tutorial! I featured it on Craft Gossip Sewing:
http://sewing.craftgossip.com/tutorial-easy-pajama-pants/2009/12/22/
--Anne
That is such a sweet idea and I really like this tutorial. I might just have to start that tradition in my own home :).
This is great! absolutely adorable! I am having a Christmas Pajama Rama contest and would love for you to enter these!
http://blissfulanddomestic.blogspot.com/2011/11/christmas-pajama-rama-contest.html
Post a Comment
How sweet of you to stop by. Kind words are always welcome.