

Now, knowing that I made this almost a year ago, please understand I am racking my brain trying to remember how I did all this just based on the photos! :)
To begin, grab your supplies.
You'll need:

Here is the paper "piping".

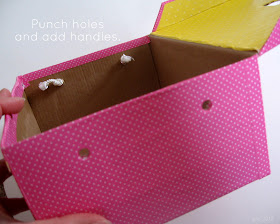
I just made sure the paper covered the inside cover, and the first half inch down the inside of the box. I also added handles, by punching through the outside with a pencil, and then threading through some rope and securing with knots.
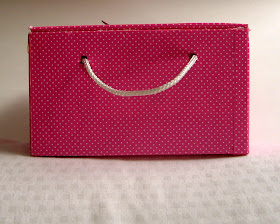
It looked like this from the outside.
Step two. Create your liner.
Make a paper pattern prior to cutting out your fabric. Ideally, you can make the liner with one piece of fabric. Measure the box bottom, and this should be the same size as the "bottom" of your liner. Determine the size the box sides, and add 1/2".
 Here is what the fabric will look like.

Cut out pockets as desired. I made mine fuller than the actual side, and made them fit the sides with pleats. Each pocket top was finished with a simple rolled hem.
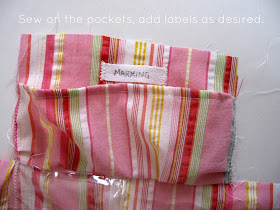
I made the labels with twill tape that I wrote the descriptors onto, and then zig zag stitched into place. I also added a clear plastic pocket with a zipper that I repurposed from something...can't remember what!

Sew the pockets so that the finished top will be up where you want it to be, which means you sew the bottom right sides together to the bottom edge of the liner. Zig zag stitch the pocket sides to liner sides.

Next, sew the corners up, using a 1/4" seam.

Finally, sew a small rolled hem around the top edge of your liner.

Your liner is finished!

As you can see, I added pockets on all four sides, and even sewed a divider on the long side of one pocket.
Step three. Glue liner in place and fill with goodies.

Here is the sewing box...filled with all the fun things that make sewing possible.


I hope that is a little clearer than mud! Remind me not to write a tutorial 10 months after the fact...

What would you do with a sewing kit like this? A special someone you know who could use one?
Sharing with Freckled Laundry, and Creation Corner.
You'll need:
- A small shoe box
- Decorative paper to cover box and for a label
- Decoupage medium and a brush to apply it
- Fabric scraps that coordinate, plan on a fat quarter size
- Coordinating thread
- Twill tape and indelible marker for labels
- Sewing tools...scissors, measuring items, iron & ironing board etc
- Hot glue gun

Here is the paper "piping".

I just made sure the paper covered the inside cover, and the first half inch down the inside of the box. I also added handles, by punching through the outside with a pencil, and then threading through some rope and securing with knots.

It looked like this from the outside.

Step two. Create your liner.
Make a paper pattern prior to cutting out your fabric. Ideally, you can make the liner with one piece of fabric. Measure the box bottom, and this should be the same size as the "bottom" of your liner. Determine the size the box sides, and add 1/2".


Cut out pockets as desired. I made mine fuller than the actual side, and made them fit the sides with pleats. Each pocket top was finished with a simple rolled hem.

I made the labels with twill tape that I wrote the descriptors onto, and then zig zag stitched into place. I also added a clear plastic pocket with a zipper that I repurposed from something...can't remember what!

Sew the pockets so that the finished top will be up where you want it to be, which means you sew the bottom right sides together to the bottom edge of the liner. Zig zag stitch the pocket sides to liner sides.

Next, sew the corners up, using a 1/4" seam.

Finally, sew a small rolled hem around the top edge of your liner.

Your liner is finished!

Step three. Glue liner in place and fill with goodies.

Here is the sewing box...filled with all the fun things that make sewing possible.


I hope that is a little clearer than mud! Remind me not to write a tutorial 10 months after the fact...

What would you do with a sewing kit like this? A special someone you know who could use one?
Sharing with Freckled Laundry, and Creation Corner.
How funny I am waiting for my box that I ordered from container store so I could make my own sewing box! :)
ReplyDeletethis is a terrific idea. i've pinned it to make it for my daughter
ReplyDeleteNice job...I like boxes you know. ;)
ReplyDeleteadorable!
ReplyDeleteAwesome! I love the handles!
ReplyDeleteSo adorable, the tomato pin cushion has brought back so many memories. My first pin cushion was a tomato pin cushion - perfect for the new sewist. Love this project.
ReplyDeleteHey I need one of those. It's just the perfect container for all those handy tools and supplies.
ReplyDeleteI've done that too. Make a tutorial months after the fact. And yes, it's an interesting process to say the least. Especially since I have THE worst memory in history. But you done good. It's a great tutorial Chris!
That's so cute! I love how it's lined with fabric, so clever!
ReplyDelete@JesikaI'd love to see what you make, Jes! Thanks for taking the time to comment.
ReplyDeleteOh I love this. This is such a great thing for any sewer. Thanks for sharing.
ReplyDeleteGreetings from Germany
Catrin
How gorgeous is this.....I love it!
ReplyDeleteThis is so fantastic, Chris. Nice job!
ReplyDelete@Simply DelusciousThank you so much. The best part is that my daughter loves her sewing box, too.
ReplyDeleteThis would be awesome for my 10 year old granddaughter that loves to sew. Also thinking about doing this for a grandson,(8) as a pocketed collection box. Thanks for the idea.
ReplyDeleteI know this is an old post, but I just wanted to say thank you! I used your idea to make my niece an adorable sewing box for Christmas. I didn't have any plastic ziplock bags like you used, so I used heavy duty freezer bags and they worked just fine! Great idea, and thanks again.
ReplyDelete