Hi everyone! I am Deidre from A Craft A Day. I am so honored to be doing this guest post for Chris' segment sewing 101. Learning to sew is truly a process, but fun at the same time. One of the most important lessons my grandmother taught me is that details and little extra steps make the end result more professional. Today I want to share with you the importance of finishing seams. These two techniques will leave you with a beautiful handmade piece.
The first technique is called "grading" the seam. You will use this for collars, pockets, cuffs and more.
First I'm going to show you what it looks like when you simply cut a seam, turn it right side out and iron.


Notice in the photo on the right that you can see the line where the seam is underneath. When making a collar, for example, this would leave your finished product unflattering.
BUT, by taking the extra step to grade the seam, your product looks so much nicer. To do this, you simply cut your two seam allowances different lengths. Here is an example.

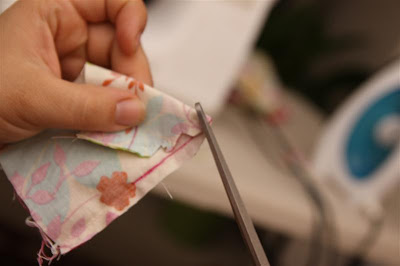
However, there is an easier way! Instead of making two cuts, you just hold your scissors at an angle and cut. While making one cut, you will be accomplishing the same thing in one step!

It won't leave the seams as dramatic, but it still works! Look how nicely the ironed seam lays flat.


The first technique is called "grading" the seam. You will use this for collars, pockets, cuffs and more.
First I'm going to show you what it looks like when you simply cut a seam, turn it right side out and iron.


Notice in the photo on the right that you can see the line where the seam is underneath. When making a collar, for example, this would leave your finished product unflattering.
BUT, by taking the extra step to grade the seam, your product looks so much nicer. To do this, you simply cut your two seam allowances different lengths. Here is an example.

However, there is an easier way! Instead of making two cuts, you just hold your scissors at an angle and cut. While making one cut, you will be accomplishing the same thing in one step!

It won't leave the seams as dramatic, but it still works! Look how nicely the ironed seam lays flat.


The next technique that I want to share with you is how to finish a curve. This is a technique you will find yourself using far more often than grading... at least, I do.
There are two things my grandmother taught me when sewing curves. The first, shorten your stitch length. The second, don't be afraid to lift and lower your presser foot to move the fabric if necessary. However, if you shorten your stitch length, you may not need to. This just makes it a smooth curve. (Kind of hard to see in the photos)
There are two things my grandmother taught me when sewing curves. The first, shorten your stitch length. The second, don't be afraid to lift and lower your presser foot to move the fabric if necessary. However, if you shorten your stitch length, you may not need to. This just makes it a smooth curve. (Kind of hard to see in the photos)
If you try to turn your fabric right sides out after you sew a curve, this is what will happen to your seam allowance...

You are left with too much fabric and not enough room for it to lay flat. Ironing does not help as you can see the bulk you are left with.

You are left with too much fabric and not enough room for it to lay flat. Ironing does not help as you can see the bulk you are left with.
Once you clip your curves, you can see how the seam allowance lays much flatter.

I hope these little techniques will help you as you step out into new projects!
Thank you, Deidre. Learning these simple steps can really make the difference in your project! Check out all the fun stuff Deidre is creating on her blog, A Craft a Day.


4 happy thoughts:
I absolutely love this series. I learn something new everyday. These are such great tips! Thank you Deidre!
Thank you for the tutorial. I actually sewed curves last night that I could not get to iron down flat. Now I know what to do next time!
:)
Courtney
ThePaisleyAbbey.com
great tips! thank you!
well, I know this comment has nothing to do with the post but... do you know the name of that fabric? It's been a long time that I've b een wanting to get some, but since I don't know its name nor the designer I haven't succeeded yet.
Post a Comment
How sweet of you to stop by. Kind words are always welcome.