I'm so excited to be part of Chris's Sewing 101! I'm Lynette, from Get Your Craft On! I don't know if I'm qualified to share tips, but I do love to sew and have learned many things in the 5 years I've been doing it. One of the very first things I learned was how to cut fabric with a Rotary Cutter. This is something I do all the time! It is essential for quilting, but is also super helpful with sewing craft projects and even clothing. Here are a few basics about cutting fabric with a rotary cutter.
First you need all of your supplies. You will need a cutting mat (most are self healing), a ruler and a rotary cutter. You can buy these supplies at Walmart, Michaels, Joann Fabrics, etc. I bought all of mine at Walmart several years ago. Mats come in all sizes, but it is nice to have one that is at least 23" or more tall, so when fabric is folded with selvages together it will completely fit on the mat. My mat is 23" square and I really like it. There are also several sizes of rulers, but again one that will reach the whole height of the fabric is best. Mine is 5" x 24" long and also has a lip on the bottom which fits snug against the bottom of my mat to help me stabilize it when cutting. You will also need a rotary cutter. Mine is 45mm, but they come in a variety of sizes and styles.
Basic Fabric Cutting:
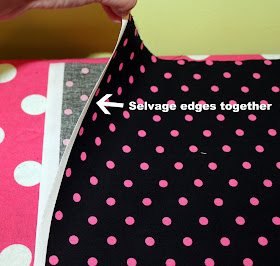
Fold fabric in half lengthwise with selvage edges meeting at the top. Iron fabric so any wrinkles won't interfere with your cutting.
Lay fabric on cutting mat with folded edge lined up with bottom line on mat. Make sure the fabric is lined up against that bottom line all the way across the mat.
Smooth out any wrinkles in fabric, so it lays flat on board with folded edge lined up with bottom line on mat.
Hold the ruler down firmly with your hand while the other hand cuts the fabric. You may have to inch your hand up carefully to support the ruler as you cut. Make sure the ruler does not move away from where you have carefully lined it up!
To cut the fabric. Push the button on your rotary cutter to have the blade out. Then place the blade at the bottom of the fabric right up against the ruler. You will need to press down firmly on your rotary cutter as you slide it against the edge of the ruler. If you're new to rotary cutting, it may take a few practice tries to really get the feel of it. Also, if the fabric isn't cutting well, make sure there is a new sharp blade on the rotary cutter. Rotary cutter blades can be replaced with no problem!
Once you have the basics of cutting down, you're ready to start a project! Use the inch marks on your mat (and ruler!) to cut out fabric to the specific dimensions required of the pattern you are making. Always check that your fabric is still lined up along the bottom line of your mat, so your cuts and measurements will be exact.
You can also use the mat and rotary cutter to free hand cut around patterns. Make sure to stabilize your pattern and fabric with some weights, then free hand cut around the pattern with your rotary cutter.
I hope these little tips help! Rotary cutters are great and can be soo helpful for sewing and are essential for quilting! I use mine all the time!!
Thanks for having me Chris...feel free to come by my place any time to say hello!
Thanks so much, Lynette! I LOVE my rotary cutter, and find I use it with almost every sewing project. I never realized I could use it to cut around curves...I'm so excited.


Those are some great tips, Thanks!!!
ReplyDeleteGreat tips!!
ReplyDeleteThanks for the tips! I'm on the hunt for a cheap cutting mat and rotary cutter so I can cut my fabric much quicker, be more precise and, most importantly, feel all professional about it =)
ReplyDeleteThank you for posting. Can you tell me how you cut apparel patterns using the self healing mat?? They never seem to be long enough, and I hate sliding the mat around underneath the fabric.
ReplyDeleteJosephine, I have a large cutting mat that suits most pattern pieces, however, for larger ones I just lay my fabric out on the floor or my kitchen counter and use my scissors. Anyone else have tips?
ReplyDeleteHi! Thanks for visiting me so I could find you. Now I'm a new follower. I'm always open to learning something new and picking up hints and tips.
ReplyDeleteEnjoy the weekend! :)
Alison
http://welcomesunshinehome.blogspot.com/
I took a class that taught me how to make sure my fabric was on grain - that might be helpful to include with these tips. Instead of cutting the raw edge, make sure that cut is along the grain of the fabric. The easiest way to do that is by just ripping it. Then when lining up the cut sides, your fabric should be on grain. If they don't line up perfectly, stretch the fabric until it does. Having the fabric lined up correctly can make a world of difference in finished products.
ReplyDeleteThanks for the comment Janimal. I'll make sure we have a post covering the parts of fabric soon.
ReplyDeleteI have trouble cutting with a rotary cutter. The cut is't always cut all the way down, or my rotary blade seems to be dul. Do you think it is the pressure I put on the cutter, or the direction the end of the rotary is facing as I follow down on my ruler?
ReplyDelete@Eva
ReplyDeleteHi Eva, it sounds like it may be a combination of dull blade and not enough pressure. You can sharpen the rotary blade by running it across aluminum foil. When you cut, be sure to apply even pressure. You should also be cutting away from yourself, and then you'll be following the correct direction. I hope that helps!