As promised, here is how the Polly Pocket Cozy turned out.
Inside, there's a couch with pillow and a side table with Polly's favorite book. There's a fuzzy rug for Polly to run her toes through, and a soft bed. To give these items some dimension, I used fusible fleece under the couch arms and back and the bed. Everything was adhered on with heat n bond, and then satin stitched. The fun part was how my son helped come up with the idea in the first place, and it was his idea to have the couch and kitty on the bed.
I adjusted the pocket size and made flaps for two pockets to keep all of Polly's accessories from falling out.
If you are interested, I'd be happy to make an applique pattern available. All the other dimensions are exactly the same as Handmade by Jill's Cozy Car Caddy, and it was constructed in the same manner.
Featured on Simply Home and Family
30 December 2009
28 December 2009
Easy Peasy Wall Art
We've been busy around our house. After Christmas means cleaning closets, sorting toys and donating unused but usable toys to charity, and general reorganizing. Saturday, I took down all of our hall pictures, puttied holes, and touched up the paint. With a blank canvas, I completely rearranged our family photos. One project I've wanted to do forever, I finally was able to do today: add some lettering under my children's photos. Last Christmas I saw THIS on Abby's blog. (Scroll down, look at the photo with her children and their stockings). I wanted to do something similar, but knew vinyl lettering wouldn't work well with my textured walls. Then, last summer I found HomeSpun Thread's Tutorial for Wall Lettering, and the result is what you see above.
I went to my favorite free font site, Font Squirrel, and found a simple modern looking font...Quicksand Lite. I printed the words the size I wanted (200 point), used my laser level to make sure it was straight and measured where center to place the letters correctly. Then used the transfer method in the tutorial.
First, I put the words where I wanted them using painter's masking tape, and made a few adjustments.
Then, I colored the BACK of the paper with pencil...I just stayed close to where the letters were.
I am so excited with the result. Just what I was hoping for...simple, effective, and a great reminder of what a blessing my children are each time I come out of my bedroom.

I went to my favorite free font site, Font Squirrel, and found a simple modern looking font...Quicksand Lite. I printed the words the size I wanted (200 point), used my laser level to make sure it was straight and measured where center to place the letters correctly. Then used the transfer method in the tutorial.
First, I put the words where I wanted them using painter's masking tape, and made a few adjustments.
Then, I colored the BACK of the paper with pencil...I just stayed close to where the letters were.
Then, with the paper taped to the wall, I traced each letter with a blunt pencil that had lost it's lead. After everything was traced, I mixed a little black craft paint mixed and glossy varnish on a paper plate so it was easy to carry. I set up my stool and carefully painted each letter with my smallest brush.

23 December 2009
Making Christmas for Each Other
This year, my older children, ages 8 and 6, are old enough to stop thinking so much about what they are getting for Christmas, and more about what they are giving. Since we have had such a long break before Christmas arrives, I decided to help my children make presents for each other. (Masochistic...maybe!)
The first project was a lot of fun. Using the Cozy Car Caddy tutorial from Handmade by Jill, the older kids made this for their 3 year old brother. They picked out the fabrics, ironed on the interfacing and heat n bond, and even helped stitch things together with LOTS of supervision. It was the first time I've tried freezer paper stencils...and it was fun, especially for my daughter.
 We used scraps of the David Walker fabric I used for POD Swaddlers, and denim cut from daddy's old jeans. I didn't have belting, so I used doubled up grosgrain ribbon I had on hand. This project was entirely made with stuff I had on hand...bonus!
 This was my first stenciling effort, and so I still need some practice with how hot to get the iron to adhere the freezer paper. My 6 year old had a ball painting the stencils. They were SO excited to get this project put together and wrapped up for their brother. It's killing them not to just tell him what they did.
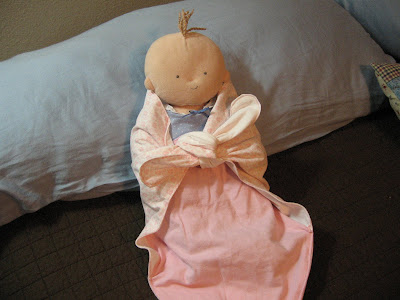
 The next project was for baby sister. Since she loves to have mom wrap up her doll and stuffed animals in blankets several times a day, I suggested we make her a swaddle blanket for her menagerie. I shrunk down and adapted the POD Swaddler pattern for a dolly size, and the kids helped me to sew it together. Typically, the kiddo sits on the piano bench in front of the sewing machine and operates the foot pedal while I help guide the fabric and give directions. It was a little scary at times, but they were thrilled to say they were sewing.
Then, it was older daughter's turn to make something for her big brother. He mentioned the other day that he'd like his own apron when helping in the kitchen, and so I used the pattern from Joanna at Stardust Shoes to make an apron. We stopped Monday at the fabric store, since I don't have a lot of "boy" fabrics in my stash, and she picked out what she liked. We tandem sewed it together last night:
(Ignore the mess behind her, please!)
The last project I forgot to photo before we wrapped it, so I promise to post it later. Big brother wanted to make Sis a toy similar to the car cozy, but for girls. He helped me to design a Polly Pocket Cozy based on Jill's design. It's the same dimensions, but instead of a road, there is a couch, rug and bed for Polly to lounge upon, and two of the pockets have flaps to hold in all of her accessories. It turned out really cute...I confess my inner little girl went a little crazy.
The best part of this experience is that my older children got so excited about making things for each other. It was SO worth being up past midnight the last two nights to see the light dancing in their eyes. We will definitely be doing this again next year...with more planning in advance!

20 December 2009
Christmas Project Show and Tell
As promised, here are photos of my handmade Christmas items.
First off, the fabric Moses basket inspired by Dana.
And, finally the reading pillows. I made these with the Sew Liberated pattern, which I altered a little. I reduced their size by 10%. I needed them to not take up too much room in our small home.
For all of these pillows, I used fabric from other projects. The camping print, stripe, and piping on the boys' pillows came from the crib bumpers I made 9 years ago. I carefully took them apart, and am excited to use the fabrics again. Similarly, the blue floral and piping on the girls' pillows are from the crib bumpers my mom made. Why not recycle fun fabrics?

First off, the fabric Moses basket inspired by Dana.
I added pockets, and made a matching pillow. Be aware that sewing with the plastic canvas was VERY difficult. Some choice words may have escaped my lips as I picked out stuff, had to resew things that didn't get in the seam, and then pulled things out a third time. (It's a good thing I did this late at night!) Overall, I am still happy with how it turned out although it is far from perfect.
Next, the second outfit for Baby's doll. The fabrics are Moda from my mom's scrap pile:
Dolly in the basket:
Here is the blankie based on Sparkle Power's tutorial:
And, finally the reading pillows. I made these with the Sew Liberated pattern, which I altered a little. I reduced their size by 10%. I needed them to not take up too much room in our small home.
I added an envelope closure on the back, since these will need washing occasionally. They are filled with the pillow forms I made that I blogged about earlier. Since the pillows are stuffed pretty well, I added velcro to keep them closed.
The boys' pillows are virtually identical, so I embroidered their initials to avoid any potential arguments:
For the girl's pillows, I rounded the bottom corners of the pockets, which actually made it easier to turn. I also added the girl's initials so no one felt left out.
Although Baby won't be reading for a while I didn't want to leave her out. I made her a special pillow with a big pocket designed like the other pillows.
Now, please don't think I am this ambitious every Christmas. Circumstances beyond my control made it necessary this year, but I am also grateful. I am glad that my kids will have some tangible things that lets them know how much I love them.

16 December 2009
Swedish Woven Heart Ornament Tutorial
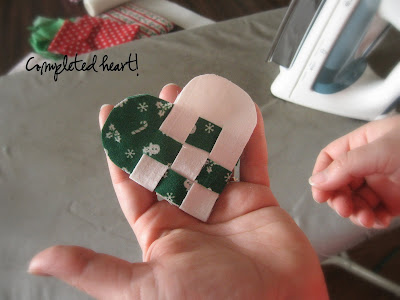
As some of you may know, my Papa Soderberg passed away in September. It's been a difficult thing for me. So, to honor him and his Swedish heritage, and to fulfill our tradition of giving our children Christmas ornaments each year, I made these Swedish Heart Christmas Ornaments. Usually, these lovely items are made with sturdy paper. I decided to try making them with fabric, and the result is this tutorial. For those of you new to sewing/crafting, these require no sewing!
So here we go:
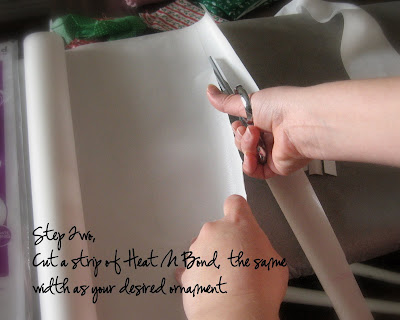
You'll need Heat N Bond Lite...I prefer buying it in bulk.
Two contrasting woven fabrics. Felt does not work for this project.
Scissors.
Iron.
Pattern, found here. It comes in two sizes. I am showing you how to make these with the smaller size.
Also,
Measuring Tape.
Skinny grosgrain ribbon.
Low temp hot glue gun and glue.
Let's begin.
Step 8, pin your pattern piece to the folded fabric. The straight portion should lie on the fold.
Now comes the FUN part!
Now, for the final phase...hot gluing the ribbon hanger.
This project lends itself to many different variations. The traditional colors are red and white, but the possibilities are limitless.
I am planning on embroidering the date and each child's initials for their individual ornaments. You could also embellish with additional ribbon.
This is what the larger size looks like:
If you make the larger ones, be sure to iron the heart really well after you finish weaving.
I hope you make lots of beautiful ornaments. Once you make one or two to get the hang of things, you can put together an assembly line-type of operation and make several in one afternoon. It took me about an hour to make six today.
Please be sure to email me your creations. I love to see them!
Featured on One Pretty Thing.
Linked to Just Another Day in Paradise.
Subscribe to:
Posts (Atom)


